Merchant First Journey
This guide walks you through a complete end-to-end workflow using the Ottu Real Estate Plugin -- from adding your first property to collecting rent payments. Follow along with the example scenario below to learn each step.
Example Scenario
Throughout this guide, we use the following example entities:
| Entity | Details |
|---|---|
| Property | Greenfield Towers -- an independent villa with 6 stories (6 units), classified as Residential Building or Villa |
| Tenant | John Doe |
| Contract | Residential Lease Agreement connecting the tenant to a specific unit |
Step 1: Add a Property
- Navigate to the Property Management section on the dashboard.
- Click Add Property.
- Fill in the New Property Form with the key details:
- Name: Greenfield Towers
- Location: Downtown City
- Classification: Residential Building or Villa
The merchant can choose to either save the property or add new units to it.
Add New Unit
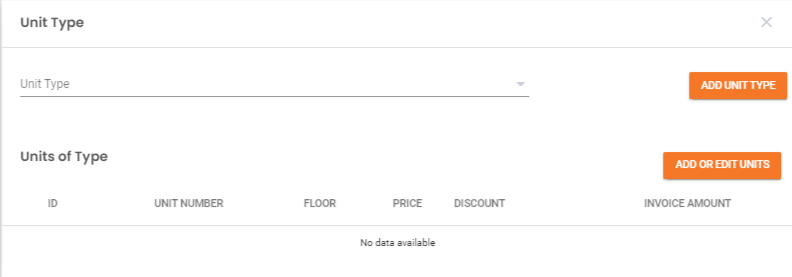
Add or Edit Units
- Click Add Unit Type with Units at the bottom of the New Property Form to open the unit details form.
- Click ADD OR EDIT UNITS to specify the number of units associated with the property.
Step 2: Add a Tenant
- Navigate to the Tenant & Contract Dashboard.
- Click Add Tenant to register a new tenant.
- Provide essential information in the New Tenant Form:
- Name: John Doe
- Contact Details: Email and phone number
- Assigned Property: Link the tenant to a specific unit or property
- Save the tenant's profile.
For a comprehensive guide, refer to the Tenant Management section.
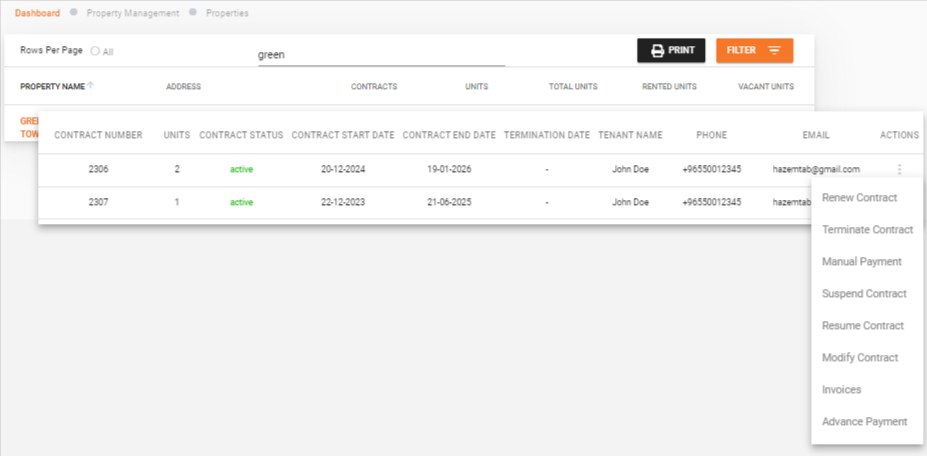
Step 3: Add a Contract
- Access the Tenant & Contract Dashboard.
- Click Add Contract to create a lease agreement.
- Fill in the New Contract Form details:
- Property Name: Greenfield Towers
- Tenant Name: John Doe
- Unit: Click ADD UNIT and select Unit Number 2
- Contract Duration: 20-12-2024 to 19-01-2026
- Payment Start Date: 01-01-2025
- Number of Invoices for Advanced Payment: 3
- Payment Period: Monthly
- Finalize and save the contract.
Refer to the Contract Management page for additional information on editing and managing contracts.
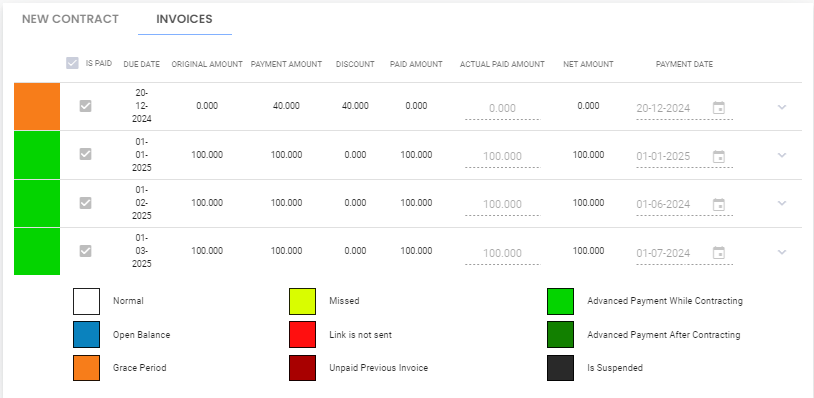
Invoices generated during contracting:
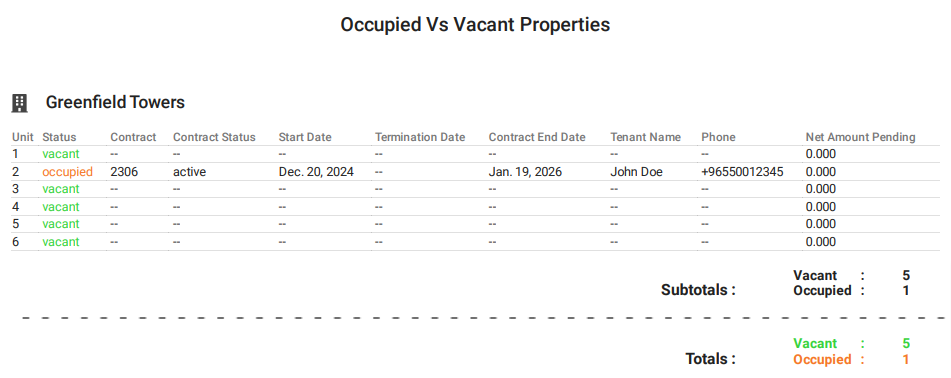
Step 4: Print Unit Vacancy Report
- Access the Property Management table in the dashboard.
- Click the Filter button to define parameters:
- Unit Type: Villa
- Property Classification: Residential Building or Villa
- Click the Print button in the Property Management table.
- The system automatically generates a PDF containing the unit vacancy details for the filtered criteria.
- Download the PDF to your device for record-keeping or sharing.
Step 5: Print and Generate Invoices
- Navigate to the Generate Invoice section.
- Choose the property as Greenfield Towers and specify the desired period (e.g., 2024-12).
- Click the Show button.
- All relevant invoices are displayed.
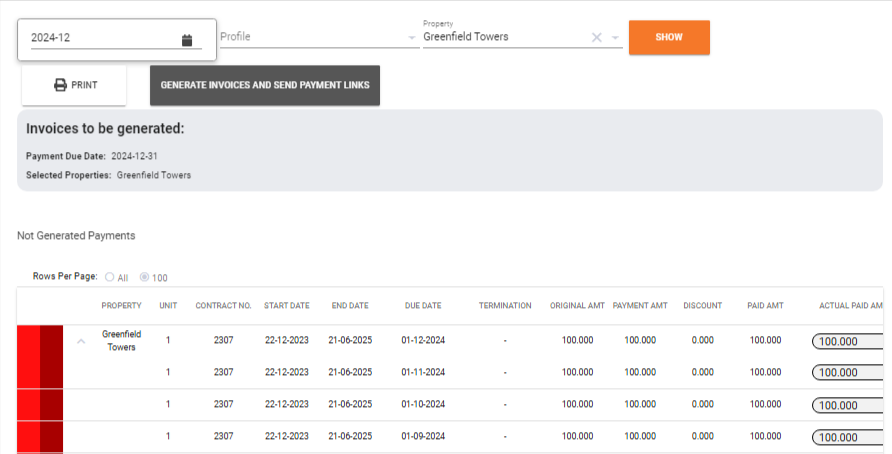
- Print Invoices:
- Click the Print button to generate a PDF report containing all displayed invoice details.
- Download the PDF for record-keeping or printing.
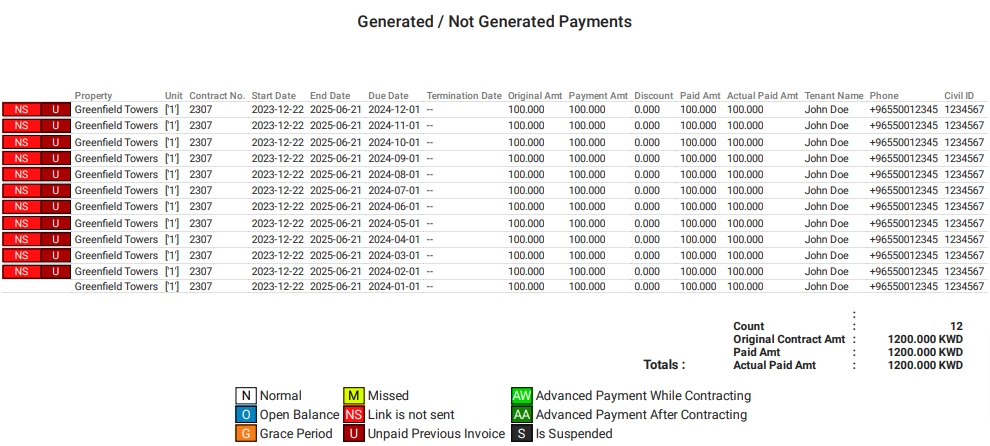
- Generate Invoices:
- Click the GENERATE INVOICES AND SEND PAYMENT LINKS button to generate the displayed invoices.
- The associated payment links are automatically sent to the respective tenants.
Refer to the Generate Invoice guide for detailed instructions.
Step 6: Pay via Invoice Link
- The invoice link is shared automatically with the tenant via email or SMS.
- The tenant accesses the payment page by clicking the link.
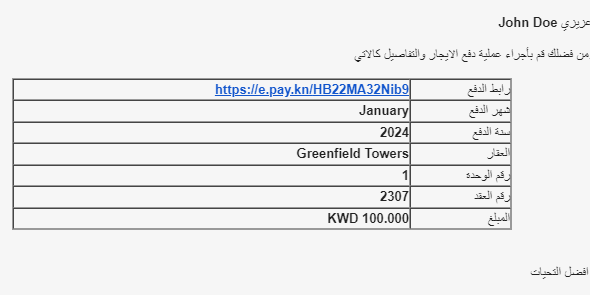
- The tenant completes the payment using available methods like cards or wallets.
Step 7: Record a Manual Payment
- Access the Contract Action List. For instructions on accessing contract actions, see the Contract Management page.
- Select Manual Payment to record an offline payment.
- After selecting Manual Payment, a Manual Payment Form appears. Fill in the required information.
- Confirm and save the transaction.
See Manual Payment for more details.
Step 8: View and Print Invoices and Payments
- Access the Invoices Dashboard.
- Use filters for specific invoices or payments by property, tenant, or date range.
- Review the details.
- Click the Print button to generate a PDF file containing invoice details for easy printing.
By following these steps, merchants can effectively manage their properties, tenants, contracts, and financial transactions, ensuring a smooth workflow and maximizing operational efficiency.
What's Next?
- Property Management -- Add and manage properties and units in detail
- Tenant & Contract Management -- Manage tenants and contracts
- Generate Invoice -- Create and send invoices
- Invoices Management -- Track and manage all invoices