web
The Checkout SDK is a JavaScript library provided by Ottu that allows you to easily integrate an Ottu-powered checkout process into your web application. With the Checkout SDK, you can customize the look and feel of your checkout process, as well as which forms of payment are accepted.
To use the Checkout SDK, you'll need to include the library in your web application and initialize it with your Ottu merchant_id, session_id, and API key. You can also specify additional options such as, which forms of payment to accept, the theme styling for the checkout interface, and more.
Please note that the Checkout SDK requires the implementation of the Checkout API in order to function properly.
For optimal security, call REST APIs from server-side implementations, not client-side applications such as mobile apps or web browsers.
Try the Checkout SDK
Experience the Ottu payment form with a live sandbox session. No real charges will be made.
Installation
To install the Checkout SDK, you'll need to include the library in your web application by adding a script tag to your HTML section. You can do this by using the following code snippet:
<head>
  <script
    src="https://assets.ottu.net/checkout/v3/checkout.min.js"
    data-error="errorCallback"
    data-cancel="cancelCallback"
    data-success="successCallback"
    data-beforepayment="beforePayment"
  ></script>
</head>
Replace errorCallback, cancelCallback, successCallback, and beforePayment with the names of your error handling, cancel handling, success handling, and beforePayment handling functions, respectively.
You're all set! You can now use the Checkout SDK to create a checkout form on your web page and process payments through Ottu.
Initialization
Checkout.init
Is the function that initializes the checkout process and sets up the necessary configuration options for the Checkout SDK. It needs to be called once on your web page to initialize the checkout process, and it must be called with a configuration object that includes all the necessary options for the checkout process.
When you call Checkout.init, the SDK will take care of setting up the necessary components for the checkout process, such as creating a form for the customer to enter their payment details, and handling communication with Ottu's servers to process the payment.
Checkout.reload
The Checkout.reload function in the Checkout SDK is used to refresh the SDK. It's useful when you want to reload the content of the SDK after an error has occurred or when the content needs to be refreshed.
Here's an example of how Checkout.reload might be called:
Checkout.reload();
Properties
Configuration options passed to Checkout.init().
Required Properties
selector string
The selector property in the Checkout SDK is used to specify the css selector for the HTML element that will contain the checkout form. This is typically a <div> element on your web page.
To specify the selector, you can add a <div> element to your web page with a unique id attribute, like this:
<div id="checkout"></div>
It's important to note that the selector property must be the ID of the HTML element that will contain the checkout form. This is because the Checkout SDK replaces the contents of the specified element with the checkout elements.
Here's an example of how Checkout.init might be called with a selector property:
Checkout.init({
  selector: "checkout",
  // ... other parameters
});
merchant_id string
The merchant_id specifies your Ottu merchant domain. This should be the root domain of your Ottu account, without the "https://" or "http://" prefix.
For example, if your Ottu URL is https://example.ottu.com, then your merchant_id is example.ottu.com. This property is used to identify which Ottu merchant account the checkout process should be linked to.
apiKey string
The apiKey is your Ottu API public key. This key is used for authentication purposes when communicating with Ottu's servers during the checkout process.
According to the REST API documentation, the apiKey property should be set to your Ottu API public key.
Ensure that you utilize the public key and refrain from using the private key. The private key should remain confidential at all times and must not be shared with any clients.
session_id string
The session_id is the unique identifier for the payment transaction associated with the checkout process.
This unique identifier is automatically generated when the payment transaction is created. For more information on how to use the session_id parameter in the Checkout API, see session_id.
Display Options
lang string
The lang property serves to designate the language for presenting the checkout elements. You can configure this property with either en for English or ar for Arabic. When lang is configured as en, the checkout form will appear in English, and if set to ar, the checkout elements will be shown in Arabic. Moreover, when the lang parameter is set to ar, the layout will adapt to a right-to-left (RTL) orientation to suit Arabic script.
For seamless user experience, it's recommended to maintain consistency by passing the same value for lang in Checkout.init used in Checkout API while creating transactions.
For more information on how to use lang parameter in the Checkout API, please refer to language parameter in Checkout API section.
formsOfPayment array
formsOfPayment allows you to customize which forms of payment will be displayed in your checkout process. By default, all forms of payment are configured.
The available options for formsOfPayment are:
applePay: The Apple Pay payment method that allows customers to make purchases using their Apple Pay-enabled devices.googlePay: The Google Pay payment method that allows customers to make purchases using their Google wallet cards linked in google accounts.ottuPG: A method that redirects customers to a page where customers enter their credit or debit card details to make a payment.tokenPay: A payment method that uses tokenization to securely store and process customers' payment information.redirect: A method where customers are redirected to a payment gateway or a third-party payment processor to complete their payment.stcPay: A method where customers enter their mobile number and provide an OTP send to their mobile number to complete their payment.urPay: A method where customers enter their mobile number and provide an OTP send to their mobile number to complete their payment.
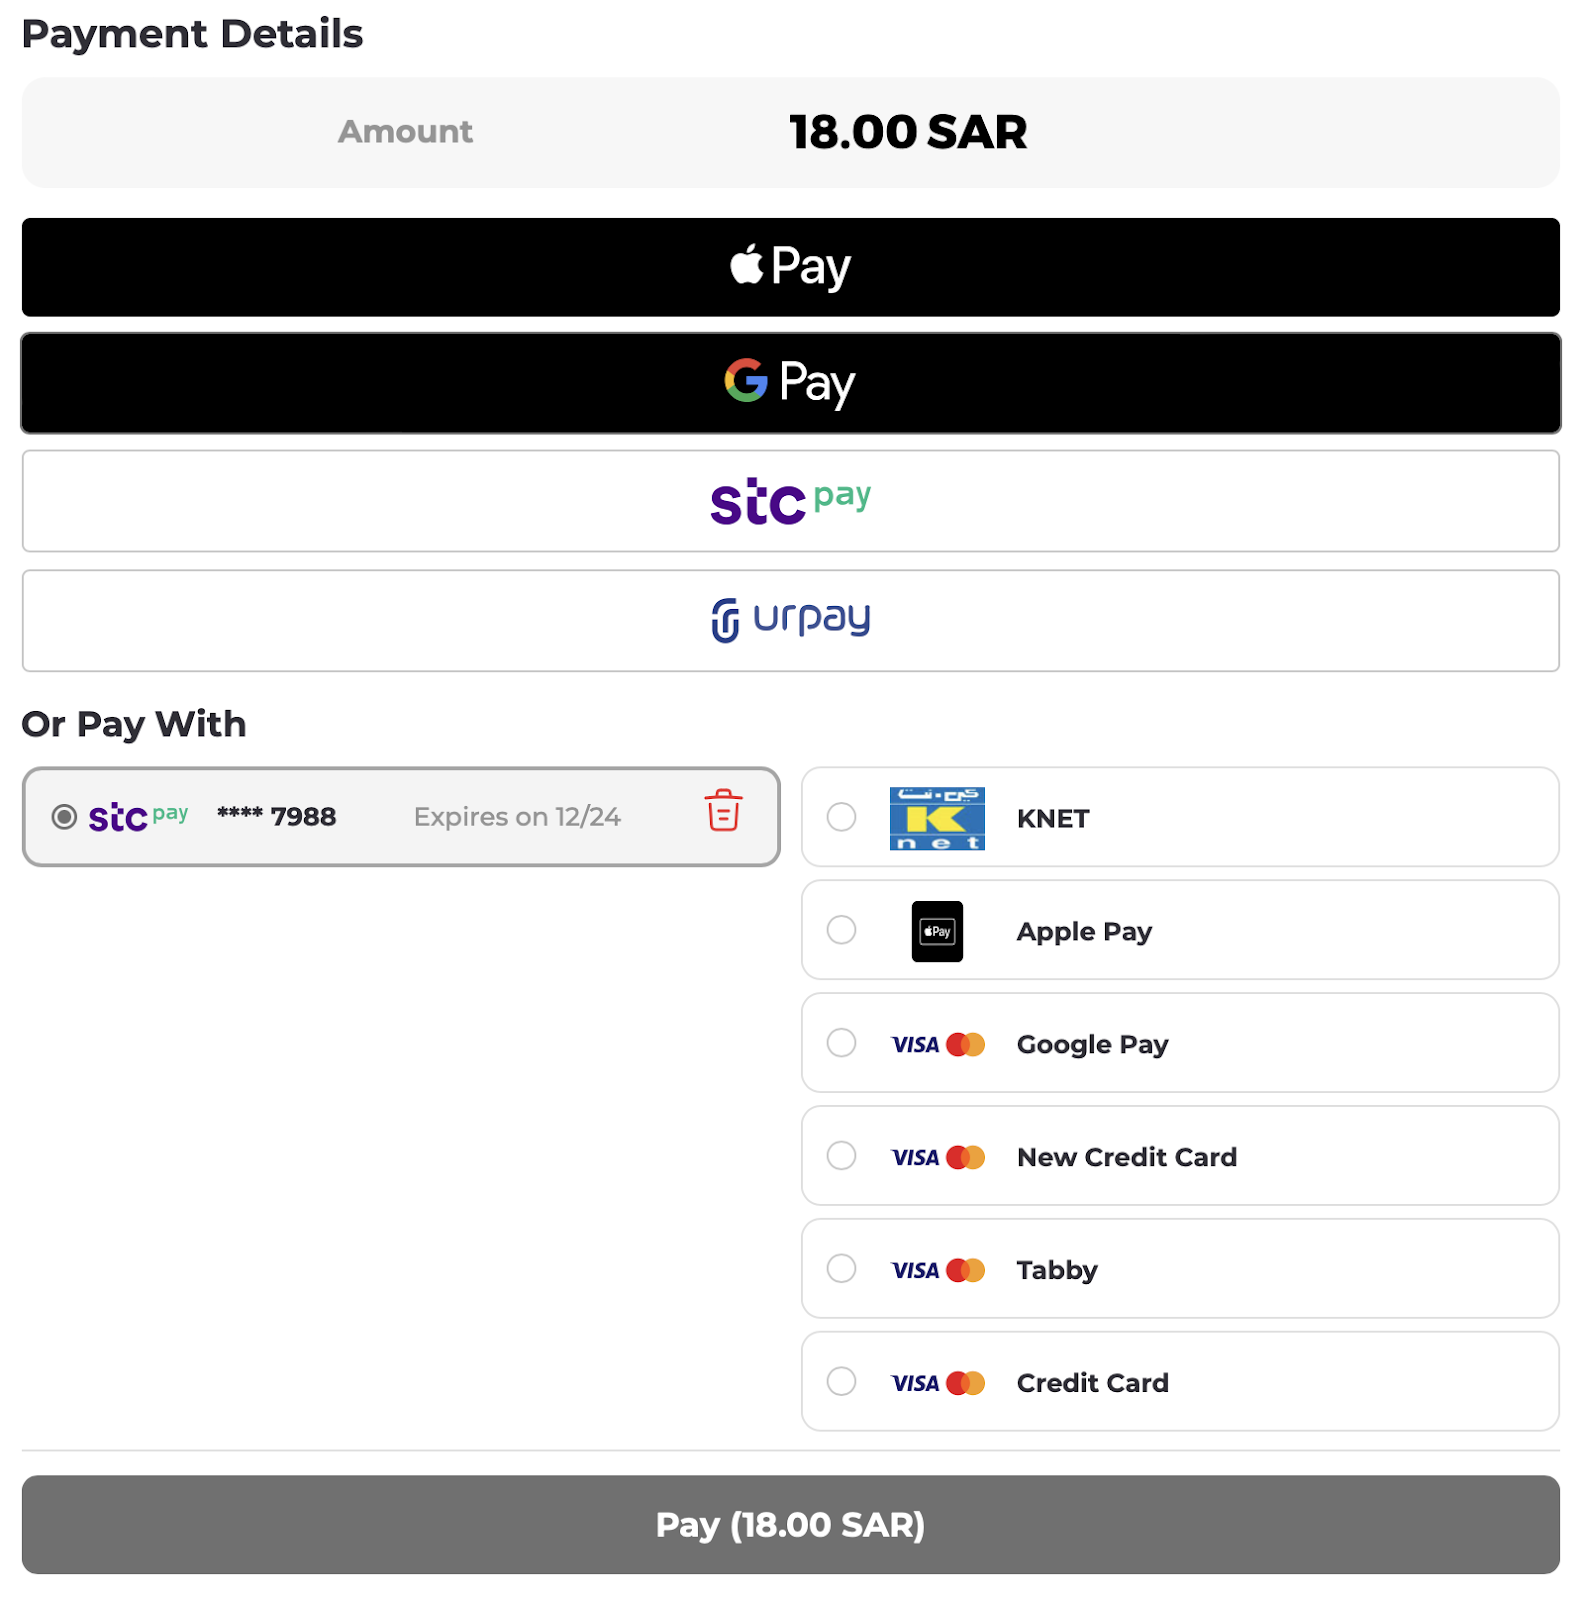
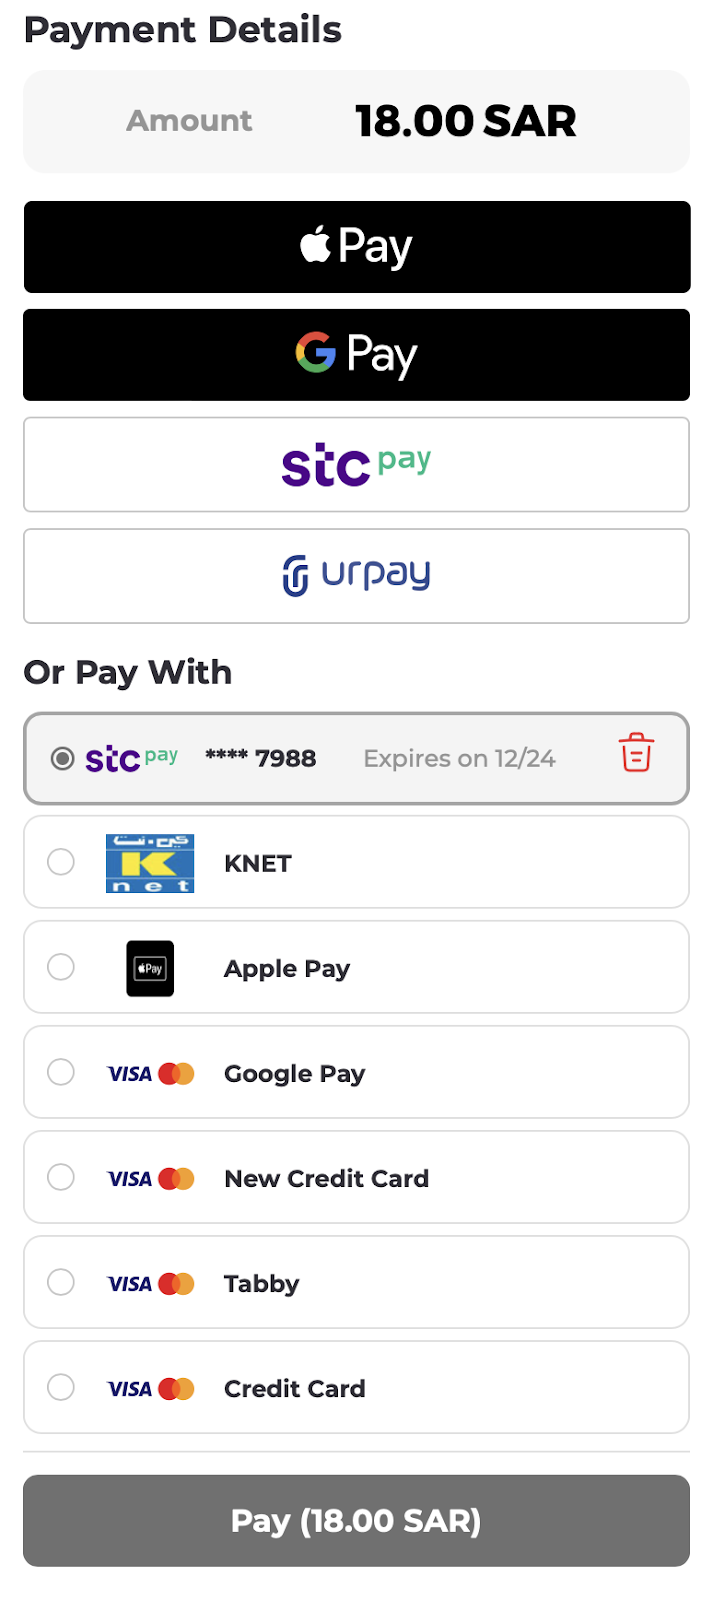
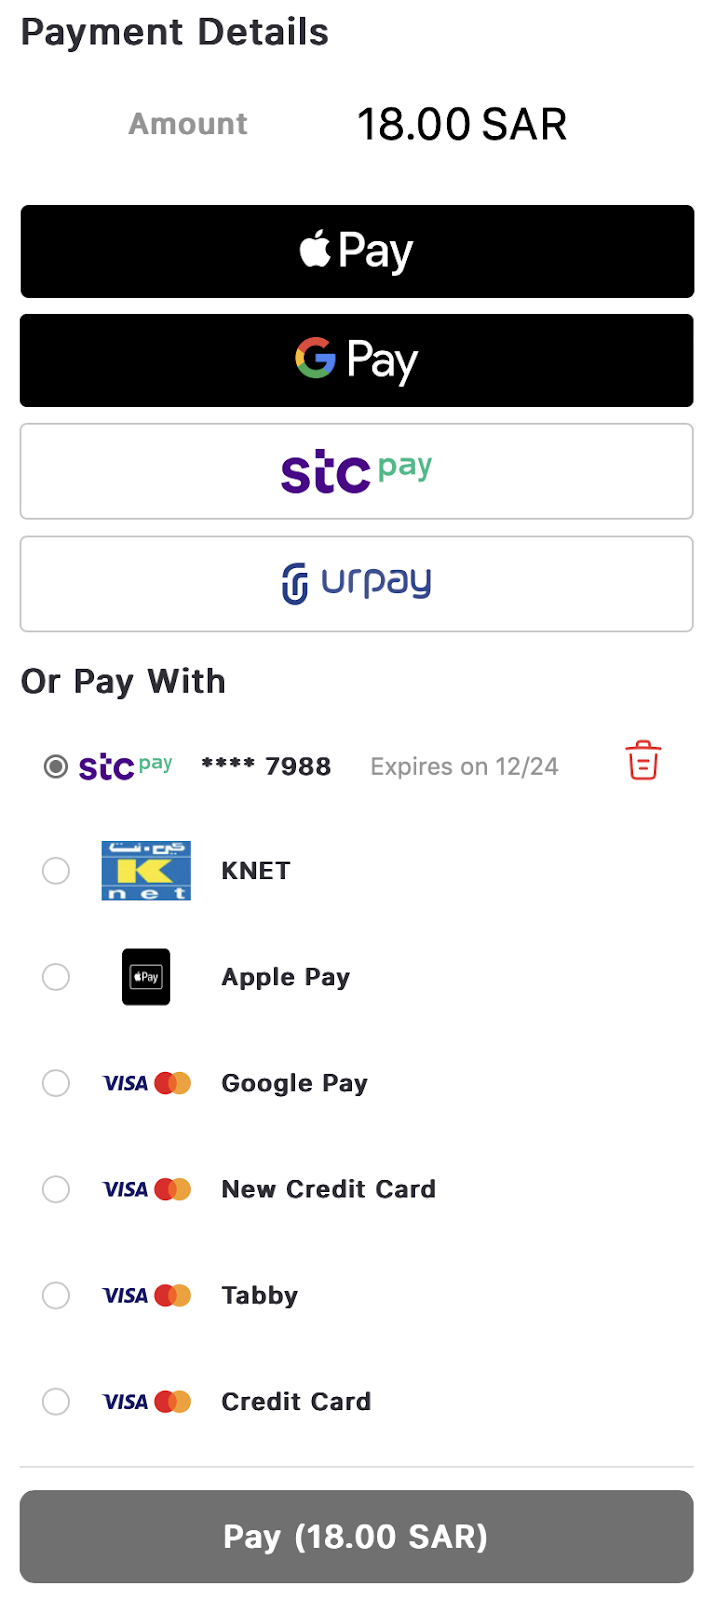
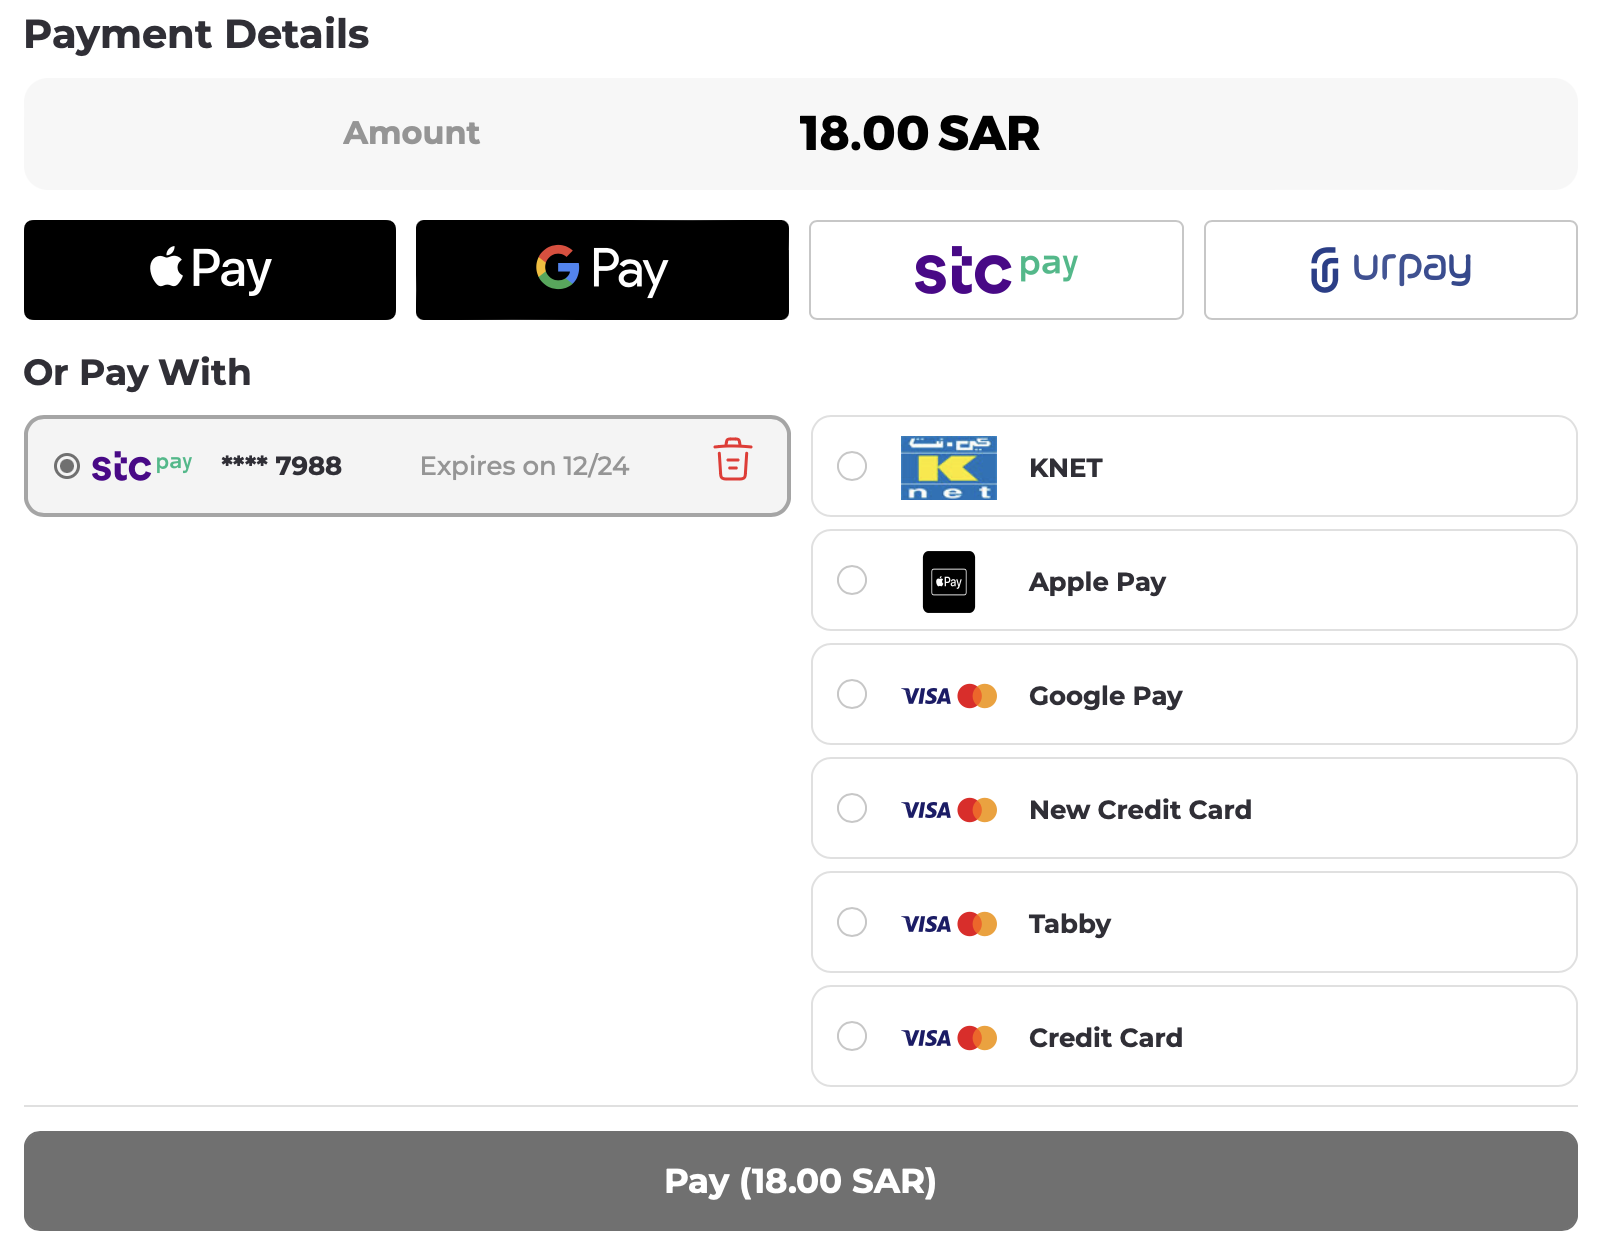
displayMode string
There are two display Modes i.e grid & column.The Default displayMode is column. Here's an example of how Checkout.init might be called to customize the displayMode
-
grid
In
gridmode, saved cards will appear on the left side and the redirect links on the right side.
Checkout.init({
  // other parameters
  displayMode: "grid",
});
-
column
Default
displayModewill becolumn, where all forms of payment appear one under another, similar to a responsive view.
Checkout.init({
  // other parameters
  displayMode: "column",
});
Preloading
setupPreload object
The setupPreload feature is designed to optimize the SDK loading experience by allowing merchants to pre-fetch transaction details and pass them to the SDK during initialization. This eliminates the need for the SDK to make an API call, resulting in faster rendering of the UI.
To utilize the setupPreload feature, include it as a property when calling checkout.init(). The setupPreload object should contain the prefetched transaction details.
Checkout.init({
  // other parameters
  setupPreload: {
    // prefetched transaction details object
  },
});
The setupPreload functionality relies heavily on the Checkout API. When calling the create or update operation of a payment transaction (using the session_id), set the include_sdk_setup_preload flag to true. This action will prompt the API to return the sdk_setup_preload_payload key, along with other values. Pass this value into the Checkout.init() just as you pass the session_id, ensuring no modifications are made to it.
For more information on how to use the setupPreload parameter, see sdk_setup_preload_payload in the Checkout API.
If the setupPreload object passed during SDKinitialization is not valid or does not adhere to the required structure, the SDK will discard it and automatically fall back to its previous functionality. In such cases, the SDK will initiate an API call to fetch the necessary transaction details from the backend. It is essential to ensure that the setupPreload object follows the specified format to leverage the instant loading feature effectively and avoid fallback scenarios and ensure a seamless integration.
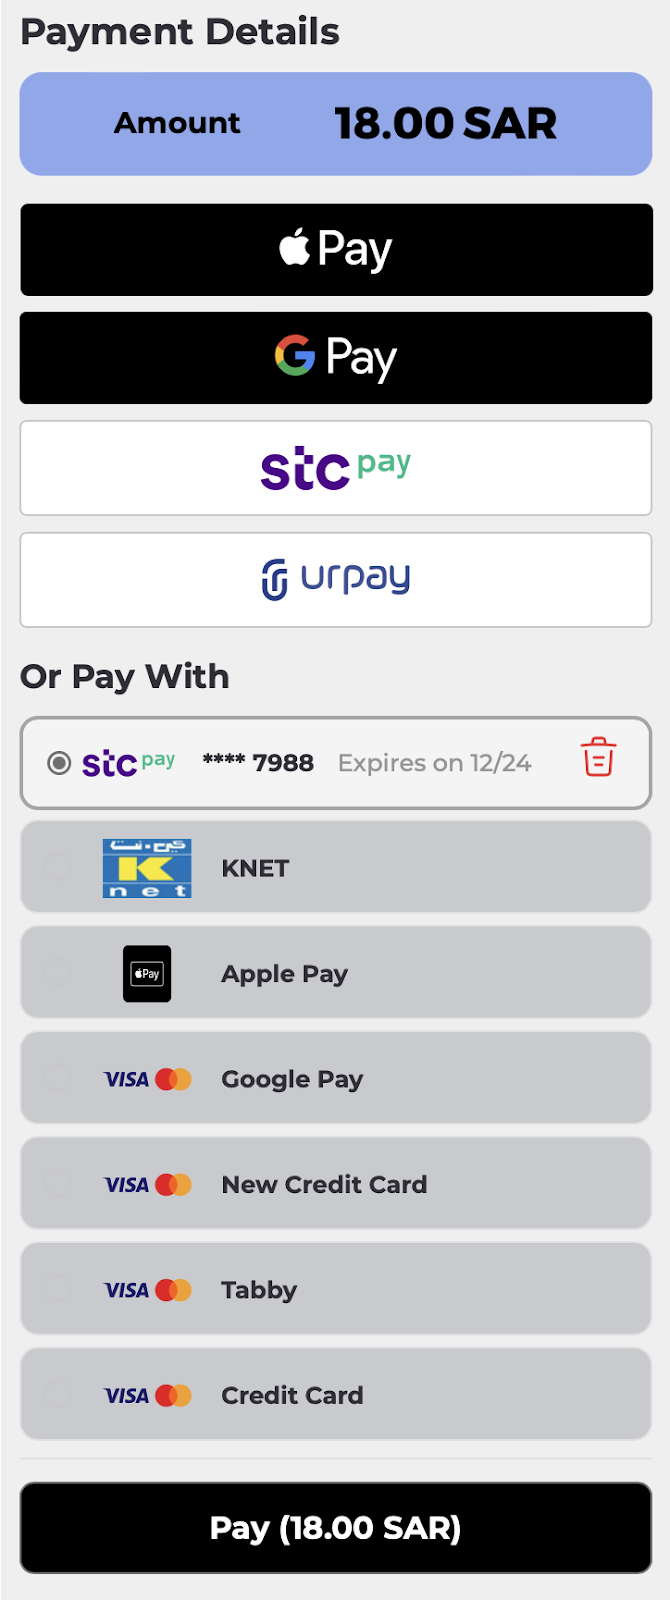
Theme object
The SDK Theme Customization feature allows you to modify the appearance of elements within the SDK using a theme object. This object contains specific css properties that are applied to various components, giving you control over their styling. theme object consists of key-value pairs, where each key corresponds to a specific component, and the associated value is a set of css properties to be applied to that component
Checkout.init({
  // other parameters
  theme: {
    "pay-button": {
      background: "black",
    },
  },
});
Here are some example themes that you can use
- Sample theme
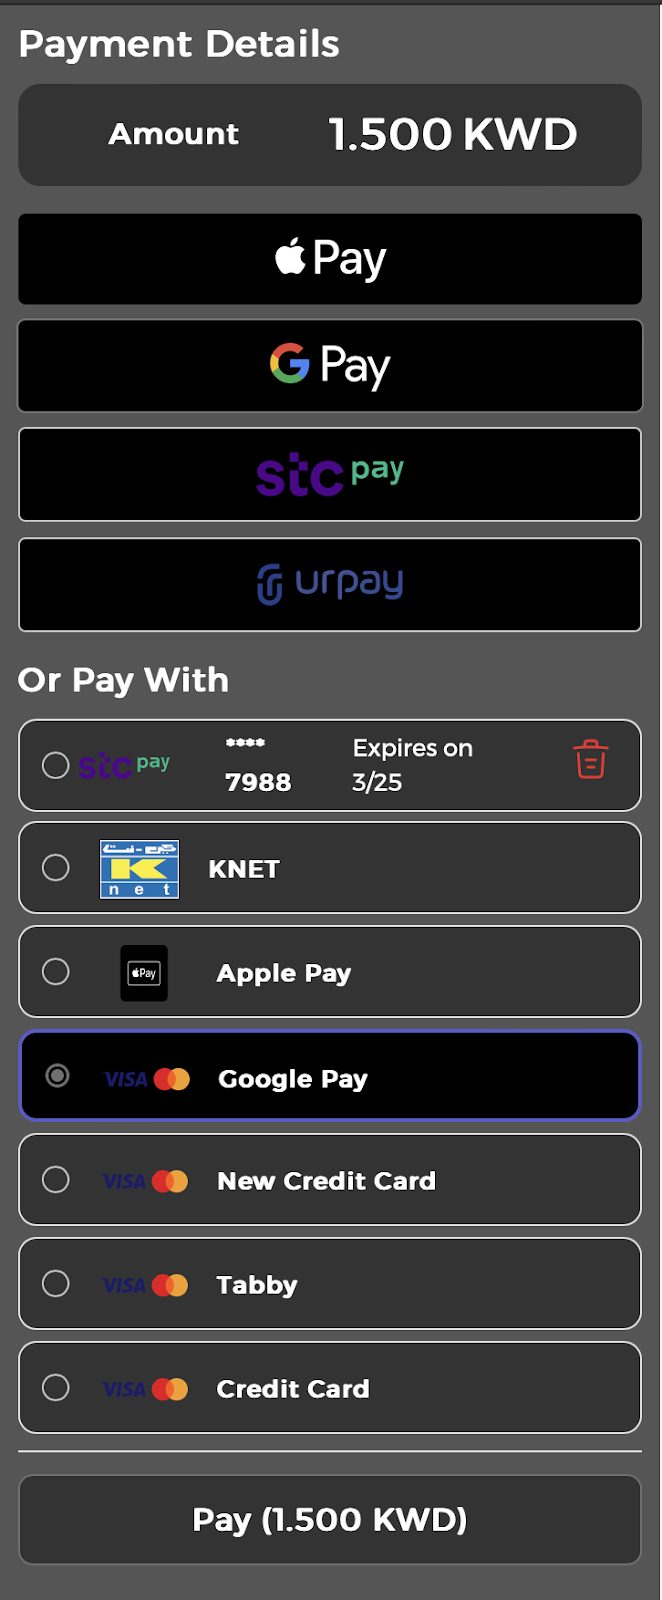
- Dark theme
- Minimal theme
- Side By Side Buttons
- Hide SDK Header
Checkout.init({
  // other parameters
  theme: {
    main: {
      background: "#d4d4d461",
    },
    "primary-text": {
      color: "black",
    },
    "pay-button": {
      background: "black",
      color: "white",
    },
    "amount-box": {
      background: "#1157e878",
    },
    methods: {
      background: "#373f5236",
    },
    "checkbox-label": {
      color: "#003aff",
    },
  },
});
Checkout.init({
  selector: "checkout",
  merchant_id: 'domain',
  session_id: 'session_id',
  apiKey: 'apiKey',
  theme: {
      "main": {
          "background": "#555555"
      },
      "title-text": {
          "color": "white"
      },
      "primary-text": {
          "color": "white"
      },
      "secondary-text": {
          "color": "white"
      },
      "pay-button": {
          "background": "#333",
          "color": "white"
      },
      "amount-box": {
          "background": "#333"
      },
      "stcPay": {
          "buttonColor": "black"
      },
      "urPay": {
          "buttonColor": "black"
      },
      "payment-modal": {
          "background": "black"
      },
      "mobile-number-input": {
          "color": "black"
      },
      "otp-input": {
          "color": "black"
      },
      "methods": {
          "background": "#333"
      },
      "selected-method": {
          "background": "black",
          "border": "2px solid #6e6ef5d4",
      },
      "card-removal-modal": {
          "background": "black"
      },
      "keep-card-button": {
          "color": "black"
      },
      "info-modal": {
          "background": "black"
      },
      "error-retry-button": {
          "color": "black"
      },
      "ccv-input": {
          "background": "black",
          "color": "white"
      },
      "floating-label": {
          "background": "black"
      },
      "payment-error-message": {
          "color": "red"
      },
      "popup-back-button": {
          "stroke": "red"
      },
      "popup-close-button": {
          "fill": "red"
      },
      "otp-resend-button": {
          "color": "black"
      }
  }
});
Checkout.init({
  selector: "checkout",
  merchant_id: "domain",
  session_id: "session_id",
  apiKey: "apiKey",
  theme: {
    "title-text": {
      "font-family": "SF PRO REGULAR",
    },
    "primary-text": {
      "font-family": "SF PRO REGULAR",
    },
    "secondary-text": {
      "font-family": "SF PRO REGULAR",
    },
    "amount-box": {
      background: "transparent",
    },
    methods: {
      background: "transparent",
      border: "none",
    },
    "selected-method": {
      background: "transparent",
      border: "none",
    },
    "ccv-input": {
      background: "transparent",
    },
    "floating-label": {
      background: "white",
    },
  },
});
Checkout.init({
  selector: "checkout",
  merchant_id: "domain",
  session_id: "session_id",
  apiKey: "apiKey",
  googlePayInit: {
    buttonColor: "black",
  },
  theme: {
    "wallet-buttons": {
      "flex-direction": "row",
      gap: "10px",
    },
  },
});
Checkout.init({
  // other parameters
  theme: {
    "payment-details-heading": {
      display: "none",
    },
    "payment-methods-heading": {
      display: "none",
    },
    "amount-box": {
      display: "none",
    },
  },
});
Scenarios
- Hide Amount
Using thethemeobject merchant can hide the amount and payment details heading according to his/her needs.
Checkout.init({
  // other parameters
  theme: {
    "payment-details-heading": {
      display: "none",
    },
    "amount-box": {
      display: "none",
    },
  },
});
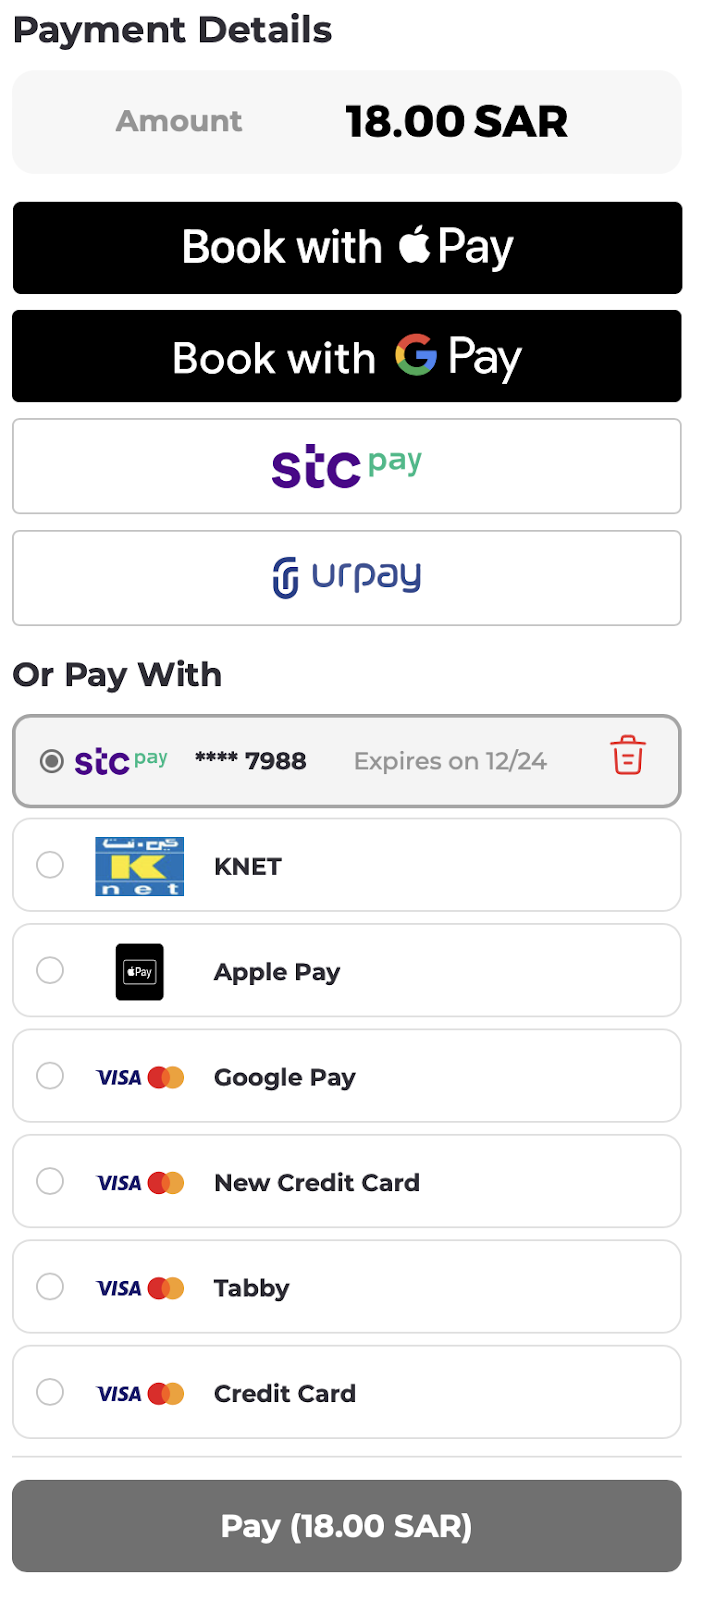
- Change Button Type
Using the buttonType property in theme object merchant can change the type of ApplePay and GooglePay buttons according to his/her needs.
Checkout.init({
  selector: "checkout",
  merchant_id: "domain",
  session_id: "session_id",
  apiKey: "apiKey",
  theme: {
    applePay: {
      buttonType: "book",
    },
    googlePay: {
      buttonType: "book",
    },
  },
});
Values supported by ApplePay buttonType are written here.
Values supported by GooglePay buttonType are written here.
buttonType property is only supported by Apple Pay and Google Pay.
However, Google Pay supports an additional property buttonSizeMode property, which can alter the Google Pay Button Size Mode. Supported values are static and fill. By default, fill is selected. Using fill allows you to change the button size, while staticsets the default size provided by Google
- Change Button Color
Using thebuttonColorproperty inthemeobject merchants can change the color ofApplePay,GooglePay,StcPay, andUrPaybuttons according to his needs.
Checkout.init({
  selector: "checkout",
  merchant_id: "domain",
  session_id: "session_id",
  apiKey: "apiKey",
  theme: {
    applePay: {
      buttonColor: "black",
    },
    googlePay: {
      buttonColor: "black",
    },
    stcPay: {
      buttonColor: "black",
    },
    urPay: {
      buttonColor: "black",
    },
  },
});
buttonColor property is supported by applePay, googlePay, stcPay, and urPay
Values supported by ApplePay buttonColor are white, black and white-outline
Values supported by GooglePay buttonColor are white and black
However, stcPay and urPay can supported any css collor in buttonColor.

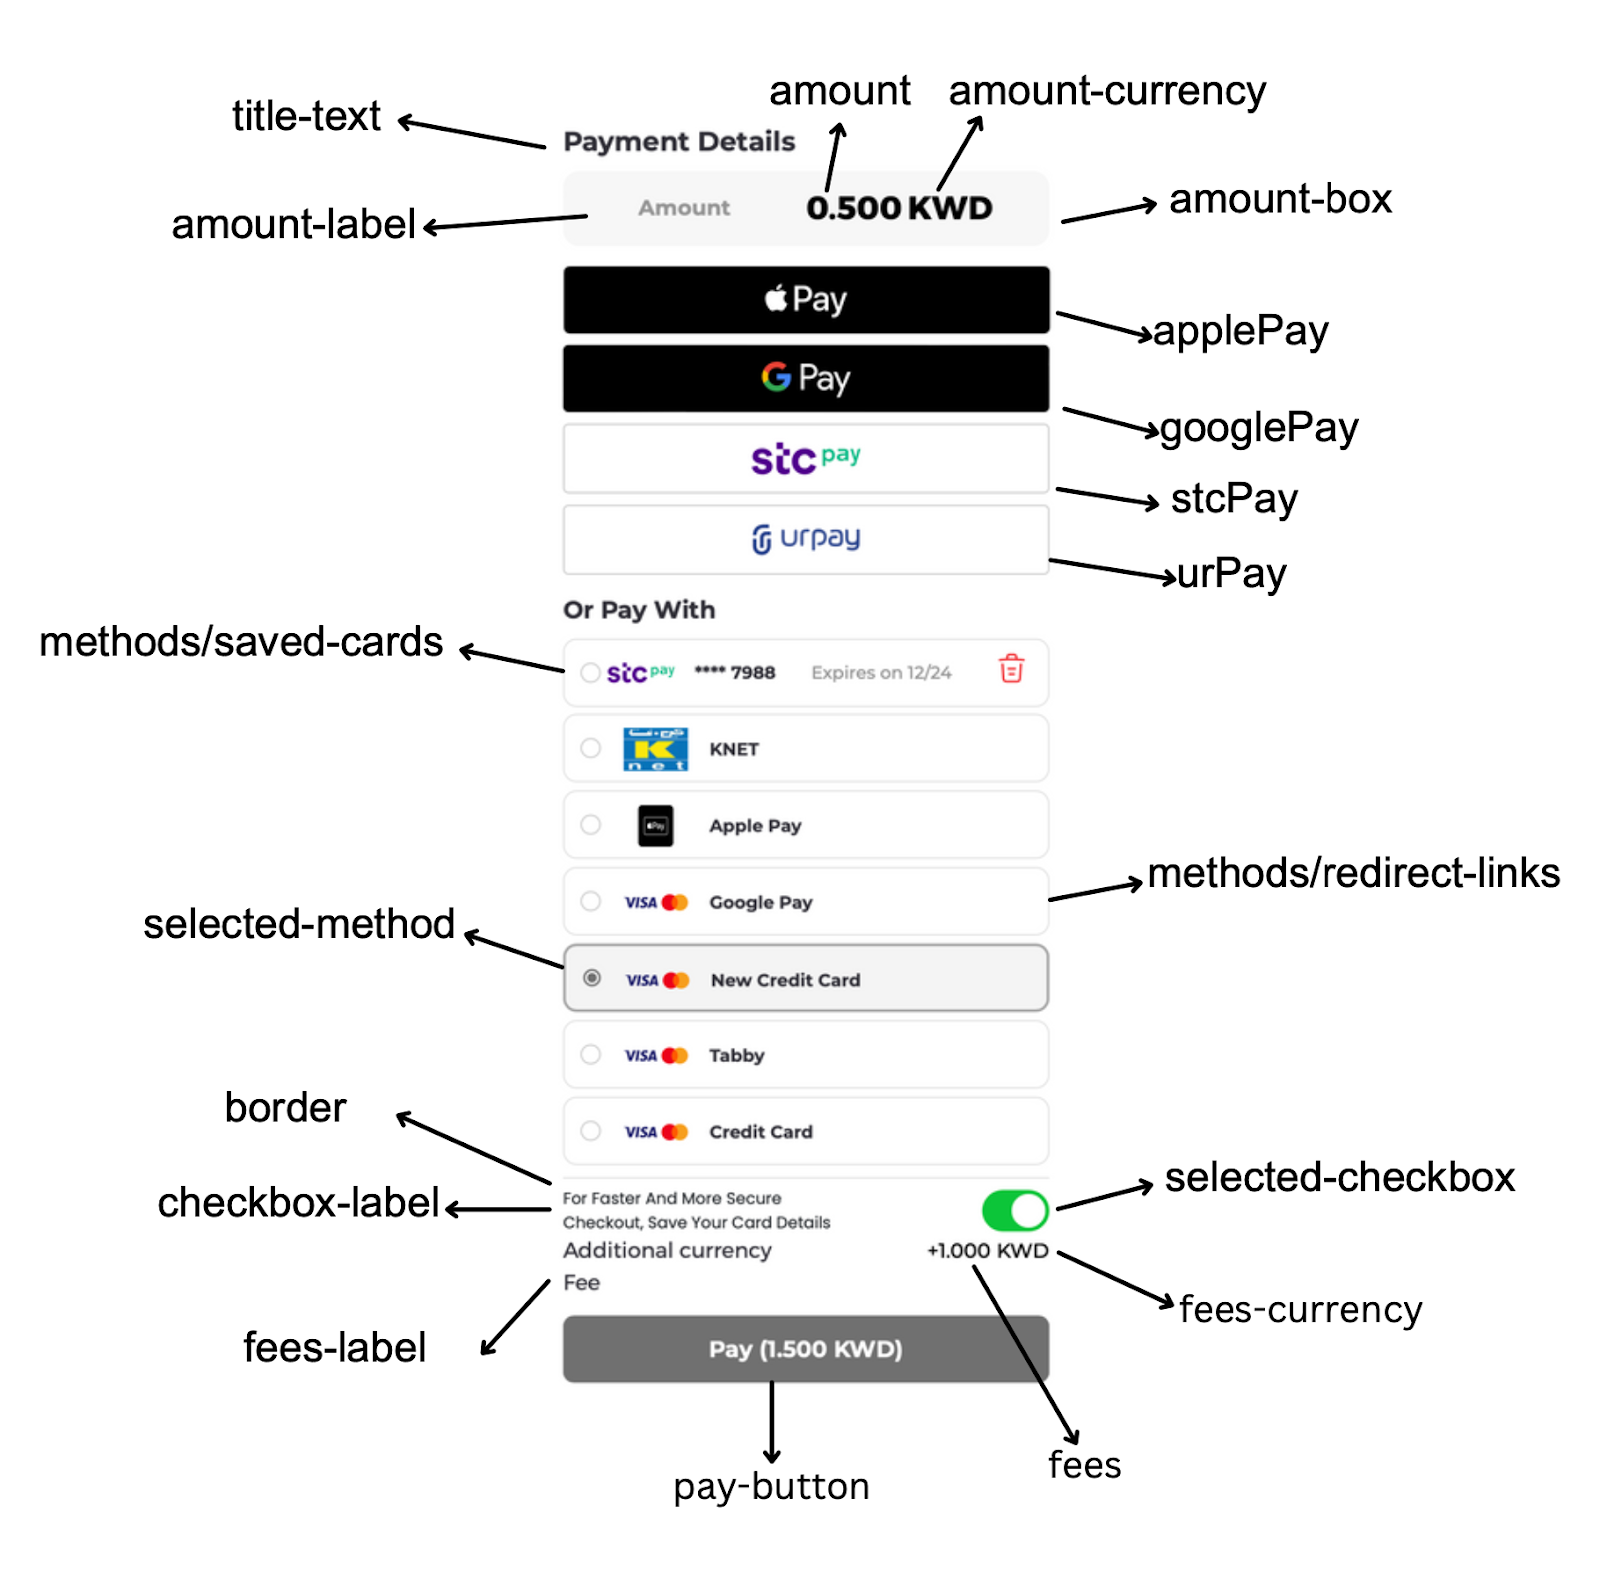
Supported Values
1. Mainmaintitle-textprimary-textsecondary-textpay-buttonborderpayment-details-headingpayment-methods-heading | 2. Amount Boxamount-boxamountamount-labelamount-currency | 3. Feesfeesfees-labelfees-currency |
4. Checkboxescheckbox-labelsave-account-labelselected-checkbox | 5. WalletButtonswallet-buttonsapplePayapplePay-tooltipgooglePaystcPayurPay | 6. PaymentMethodsmethods-blockmethodssaved-cardsredirect-linksselected-methodpayment-method-namecard-numbercard-expirydelete-card-logoccv-inputfloating-labelcvv-info-text |
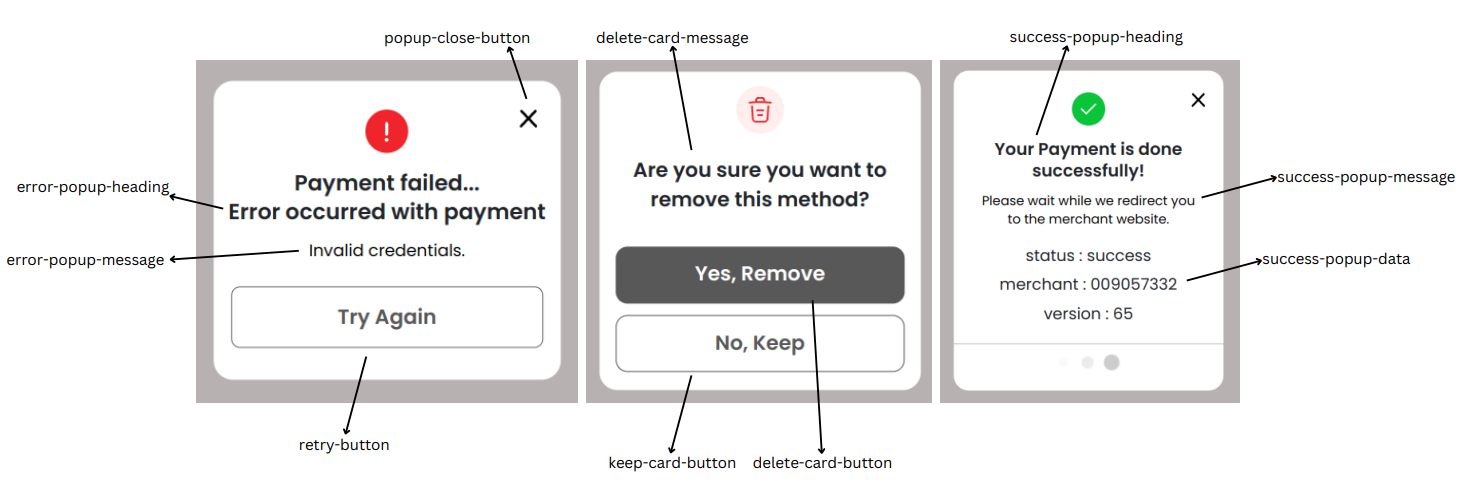
7. Modalscard-removal-modalinfo-modalpayment-modalmodal-overlay | 8. CloseButtonpopup-close-button | 9. DeleteCardPopupdelete-card-buttondelete-card-messagekeep-card-button |
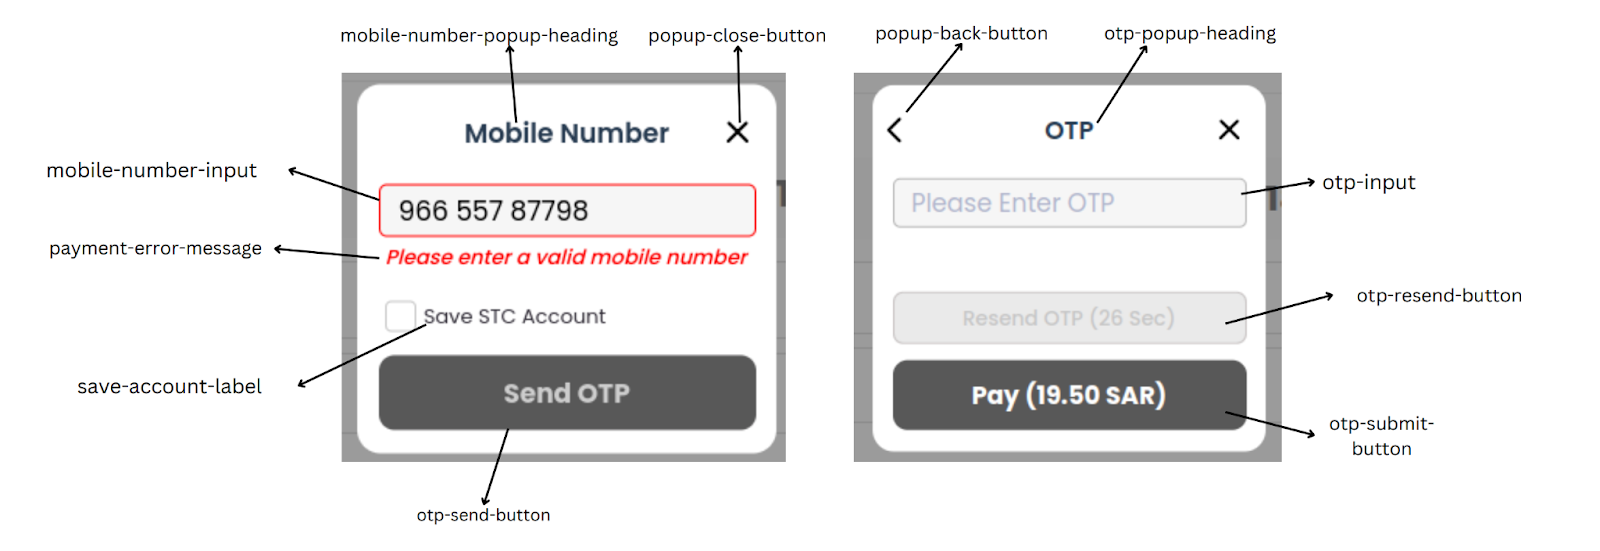
10. ErrorPopuperror-popup-headingerror-popup-messageerror-popup-dataretry-button | 11. SuccessPopupsuccess-popup-headingsuccess-popup-messagesuccess-popup-data | 12. PaymentPopupmobile-number-popup-headingotp-popup-headingmobile-number-inputotp-inputpayment-error-messageotp-send-buttonotp-resend-buttonotp-submit-buttonpopup-back-button |
Example
HTML<div id="checkout"></div>
Checkout.init({
  selector: "checkout",
  merchant_id: "domain",
  session_id: "session_id",
  apiKey: "apiKey",
  lang: "en",
  formsOfPayment: [
    "applePay",
    "tokenPay",
    "ottuPG",
    "redirect",
    "googlePay",
    "stcPay",
    "urPay",
  ],
  displayMode: "grid", // default is column
});
Wallet Configuration
Apple Pay
applePayInit object
The applePayInit object enables users to modify the Apple Pay configurations used for generating payment sessions through Apple Pay. By default, all options are pre-configured. However users have the flexibility to customize these configurations using applePayInit according to their requirements.
- buttonLocale
Users can change Apple Pay Button Locale by using buttonLocale property.
Value of buttonLocale must be a 2 letter language code likear,enetc. - version
Users can change the API version used for creating Apple Pay payment session by using the version property. Values supported by version are written here.
In addition to above properties, users have the capability to customize the Apple Pay payment request using properties defined here. However, due to backend constraints, not all properties are modifiable. Below is the list of supported and unsupported values:
Supported Properties
merchantCapabilitiesmerchantIdentifiersupportedNetworkscountryCodesupportedCountriestotallineItemscurrencyCode
Unsupported Properties
requiredBillingContactFieldsbillingContactrequiredShippingContactFieldsshippingContactshippingContactEditingModesupportsCouponCodecouponCodeapplicationData
Checkout.init({
    selector: "checkout",
    merchant_id: 'domain',
    session_id: 'session_id',
    apiKey: 'apiKey',
    // Default values configured for Apple Pay
    applePayInit: {
        version: 6
        buttonLocale: 'en',
        supportedNetworks: ['amex', 'masterCard', 'maestro', 'visa', 'mada'],
        merchantCapabilities: ['supports3DS']
        // Remaining values are configured via init checkout API
    }
});
If you have completed the Apple Pay integration between Ottu and Apple, the Checkout SDK will automatically make the necessary checks to display the Apple Pay button.
When you initialize the Checkout SDK with your session_id and payment gateway codes, the SDK will automatically verify the following conditions:
- When initializing the Checkout SDK, a session_id with a pg_codes that was associated with the Apple Pay Payment Service was supplied.
- The customer has an Apple device that supports Apple Pay payments.
- The browser being used supports Apple Pay.
- The customer has a wallet configured on their Apple Pay device.
If all of these conditions are met, the Apple Pay button will be displayed and available for use in your checkout flow. If the wallet is not configured, the Apple Pay button will still appear.Clicking on the button Apple Pay wallet on their device will open, allowing them to configure it and add payment cards.
By default, the type of the Apple Pay button is pay, which is used to initiate a payment. However, you can override the default button type using the applePayInit property of the Checkout SDK.
Customize Button
If you're using only the Apple Pay button from the Checkout SDK and wish to customize its appearance, it's vital to adhere to the Apple Pay guidelines to ensure your design aligns with Apple's specifications. Note that the SDK uses default styles outlined in the guidelines. Using styles not supported by Apple, such as certain background-colors or border-colors, will not take effect. Failure to comply with these guidelines could lead to your app being rejected or even a ban on your developer account by Apple.
It's the responsibility of the merchant to ensure that their use of the Apple Pay button follows Apple's guidelines, and Ottu cannot be held responsible for any issues that arise from non-compliance. If you have any questions or concerns about using the Apple Pay button, please consult the Apple Pay guidelines or contact Apple directly for assistance.
If you only want to use Apple Pay with the Ottu Checkout SDK and control the other payment methods yourself, you can customize the Apple Pay button using the Checkout SDK's formsOfPayment, applePayInit and theme properties.
Properties like buttonColor, buttonType and css properties like height, width, margin etc are can be customized using theme while buttonLocale can be customized using ApplePayInit
To display only the Apple Pay button with default css, use the following code:
Checkout.init({
  // Define the mandatory properties
  formsOfPayment: ["applePay"],
});
The formsOfPayment property tells the Checkout SDK to render only the Apple Pay button. If you don't include this property, the SDK will render all available payment options.
To customize the Apple Pay button's appearance, you can use the theme property. The example below adjusts the size of the button and centers it within the Checkout SDK container:
Checkout.init({
    // Define the mandatory properties
    formsOfPayment: ["applePay"],
    theme: {
        applePay: {
            "buttonType": 'plain',
            "buttonColor": 'black'
            "width": '100%',
            "height": '50px',
            "margin-top": '0',
            "margin-bottom": '0',
        }
    }
});
The Apple Pay button inside the Checkout SDK container can be customized using the theme property by defining the following:
theme.applePay: This class sets the width,height, margin, and padding of the button.theme.applePay.buttonType: This determines the type of the Apple Pay button.
For example, settingbuttonType:plainwill render a plain Apple Pay button.buyordonatewill render buttons with the corresponding labels.
theme.applePay.buttonColor: This determines the color of the Apple Pay button.
For example, settingbuttonColor:blackwill render a black Apple Pay button.whiteorwhite-outlinewill render buttons with the corresponding colors.
By default, the width of the Apple Pay button is 100% of the Checkout SDK container width, gap of 8px from other buttons. The Checkout SDK creates a containerized div with the css class ottu__sdk-main and places the Apple Pay button inside it. This container has no margin or padding added, as shown in below figure. To learn more about the applePay property, see the theme.

KNET Integration
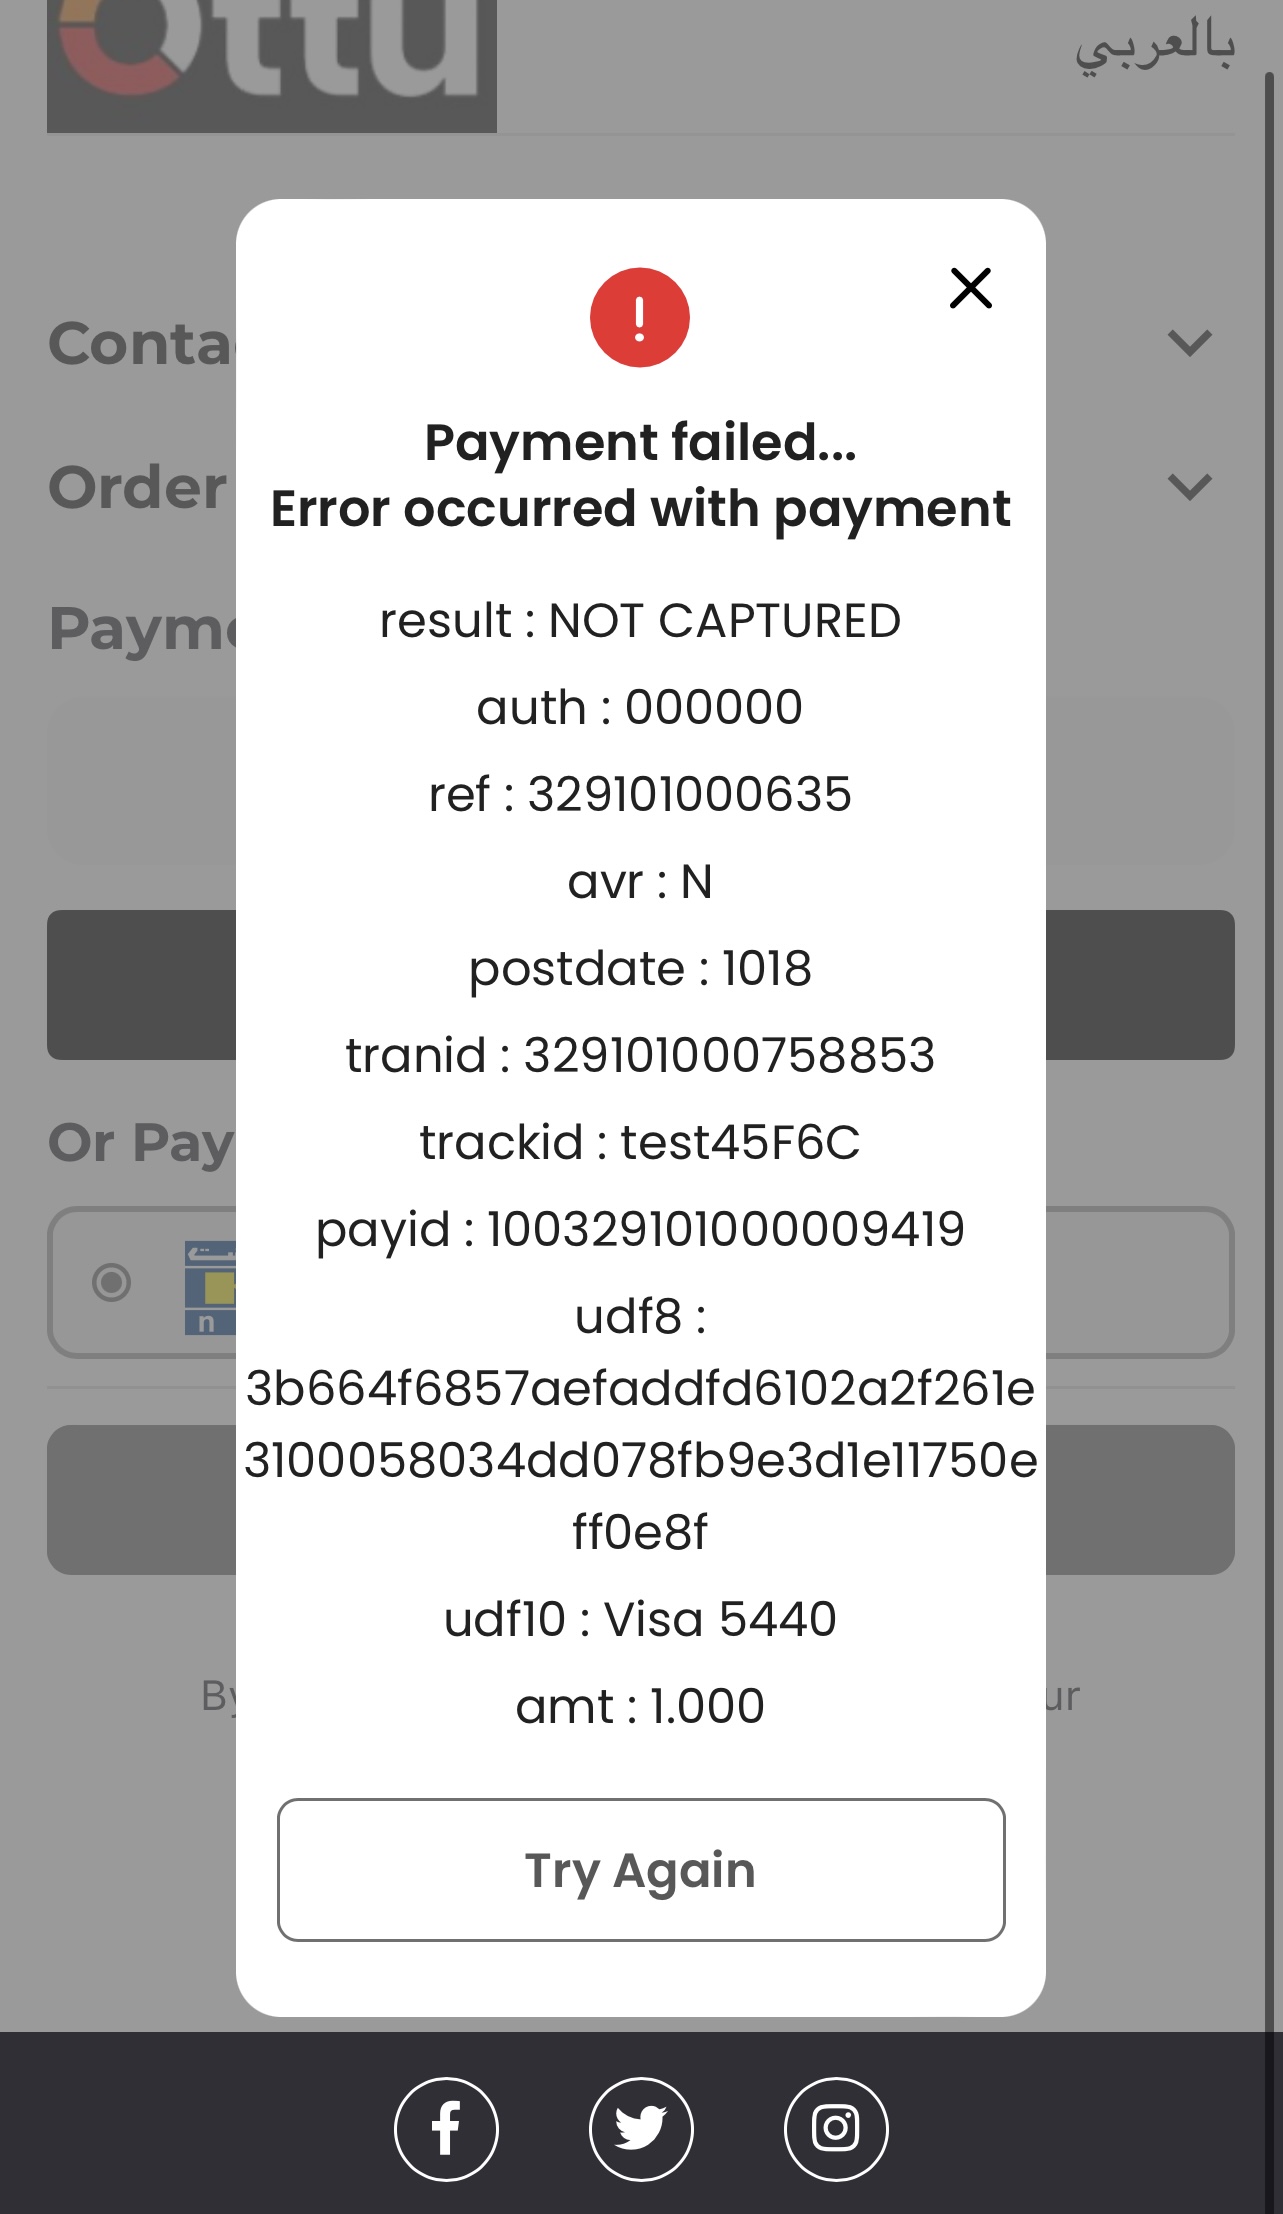
Due to compliance requirements, KNET requires a popup displaying the payment result after each failed payment. This is available only on the cancelCallback when there is a response from the payment gateway. As a side effect, the user can not try again the payment without clicking on Apple Pay again.
The use of the popup notification described above is specific to the KNET payment gateway. Other payment gateways might have different requirements or notification mechanisms, so be sure to follow the respective documentation for each payment gateway integration.
To properly handle the popup notification for KNET, you need to implement the provided code snippet into your payment processing flow. The code looks like this:
window.cancelCallback = function (data) {
  // If payment fails with the status "canceled," the SDK triggers the cancelCallback.
  // In cancelCallback, we show an error popup by checking
  // if pg_name is in data.payment_gateway_info is "kpay" or data.form_of_payment is "token_pay".

  if (
    data.payment_gateway_info &&
    data.payment_gateway_info.pg_name === "kpay"
  ) {
    // Displays a popup with pg_response as key-value pairs.
    window.Checkout.showPopup(
      "error",
      " ",
      data.payment_gateway_info.pg_response,
    );
  } else if (data.form_of_payment === "token_pay" || data.challenge_occurred) {
    const message =
      "Oops, something went wrong. Refresh the page and try again.";
    // Displays a popup with data.message if present, else displays a static message.
    window.Checkout.showPopup("error", data.message || message);
  }

  console.log("Cancel callback", data);
};
The above code performs the following checks and actions:
- It first verifies if the
cancelobject contains information about the payment gateway (payment_gateway_info). - Next, it checks if the
pg_nameproperty inpayment_gateway_infois equal tokpay, indicating that the payment gateway used is indeed KNET. - If the above conditions are met, it retrieves the payment gateway's response from the
pg_responseproperty or, if not available, uses a default "Payment was cancelled." error message. - Finally, it displays the error message in a popup using the
window.Checkout.showPopup()function to notify the user about the failed payment.
Google Pay
googlePayInit object
The googlePayInit object enables users to modify the Google Pay configurations used for generating payment sessions through Google Pay. By default, all options are pre-configured. However, developers have the flexibility to customize these configurations using googlePayInit according to their requirements.
- buttonLocale
Users can change Google Pay Button Locale by usingbuttonLocaleproperty.
Value ofbuttonLocalemust be a 2 letter language code likear,en,etc...
In addition to above properties, users have the capability to customize Google Pay payment request by utilizing the options outlined in the documentation here.However, due to backend constraints, not all properties are modifiable. Below is the list of supported and unsupported values:
Supported Properties
apiVersionapiVersionMinorenvironmentemailRequiredmerchantIdmerchantNametokenizationSpecificationTypepublicKeygatewaygatewayMerchantIdallowedAuthMethodsallowedCardNetworksallowPrepaidCardsallowCreditCardsbillingAddressRequiredassuranceDetailsRequiredbillingAddressParametersdisplayItemstotalPricetotalPriceLabeltotalPriceStatuscountryCodecurrencyCode
Unsupported Properties
shippingAddressRequiredshippingAddressParametersshippingOptionRequiredshippingOptionParametersofferInfocallbackIntentsexistingPaymentMethodRequired
Example
Checkout.init({
  // Other parameters
  googlePayInit: {
    apiVersion: 2,
    apiVersionMinor: 0,
    allowedCardNetworks: [
      "AMEX",
      "DISCOVER",
      "INTERAC",
      "JCB",
      "MASTERCARD",
      "VISA",
    ],
    allowedCardAuthMethods: ["PAN_ONLY", "CRYPTOGRAM_3DS"],
    allowPrepaidCards: true,
    allowCreditCards: true,
    billingAddressRequired: false,
    assuranceDetailsRequired: false,
    existingPaymentMethodRequired: true,
    tokenizationSpecificationType: "PAYMENT_GATEWAY",
    totalPriceStatus: "FINAL",
    totalPriceLabel: "TOTAL",
    buttonLocale: "en",
    // Remaining Values are configured via
    // init checkout API
  },
});
If you have completed the Google Pay integration between Ottu and Google Pay, the Checkout SDK will handle the necessary checks to display the Google Pay button seamlessly.
When you initialize the Checkout SDK with your session_id and payment gateway codes pg_codes , the SDK will automatically verify the following conditions:
- The
session_idandpg_codesprovided during SDK initialization must be associated with the Google Pay Payment Service. This ensures that the Google Pay option is available for the customer to choose as a payment method. - Web SDK checks if the merchant configuration for Google Pay is correct or not and then show Google Pay button based on it.
- The Web SDK displays the Google Pay button irrespective of whether the customer's Google Pay wallet is configured. When the customer clicks the button, they are prompted to log in with their email and add their card if their wallet is not set up.
Google Pay configuration is controlled by using googlePayInit object.
Customize Button
If you're using only the Google Pay button from the Checkout SDK and wish to customize its appearance, it's vital to adhere to the Google Pay guidelines to ensure your design aligns with Google's specifications. Note that the SDK uses default styles outlined in the guidelines. Using styles not supported by Google, such as certain background-colors or border-colors, will not take effect. Failure to comply with these guidelines could lead to your app being rejected or even a ban on your developer account by Google.
It's the responsibility of the merchant to ensure that their use of the Google Pay button follows Google's guidelines, and Ottu cannot be held responsible for any issues that arise from non-compliance. If you have any questions or concerns about using the Google Pay button, please consult the Google Pay guidelines or contact Google directly for assistance.
You can customize the Google Pay button using the Checkout SDK's formsOfPayment, googlePayInit and theme . The formsOfPayment property tells the Checkout SDK to render only the Google Pay button. If you don't include this property, the SDK will render all available payment options.
Properties like buttonColor, buttonType, buttonSizeMode and css properties like height, width, margin etc can be customized using theme while buttonLocale can be customized using googlePayInit .
Checkout.init({
    // Define the mandatory properties
    formsOfPayment: ["googlePay"],
    // Below are the default values configured for googlePay
    },
    theme: {
        googlePay: {
            "buttonType":"plain",
            "buttonColor":"black",
            "width": "100%",
            "height": "50px",
            "margin-top": "0",
            "margin-bottom": "0",
        }
    }
});

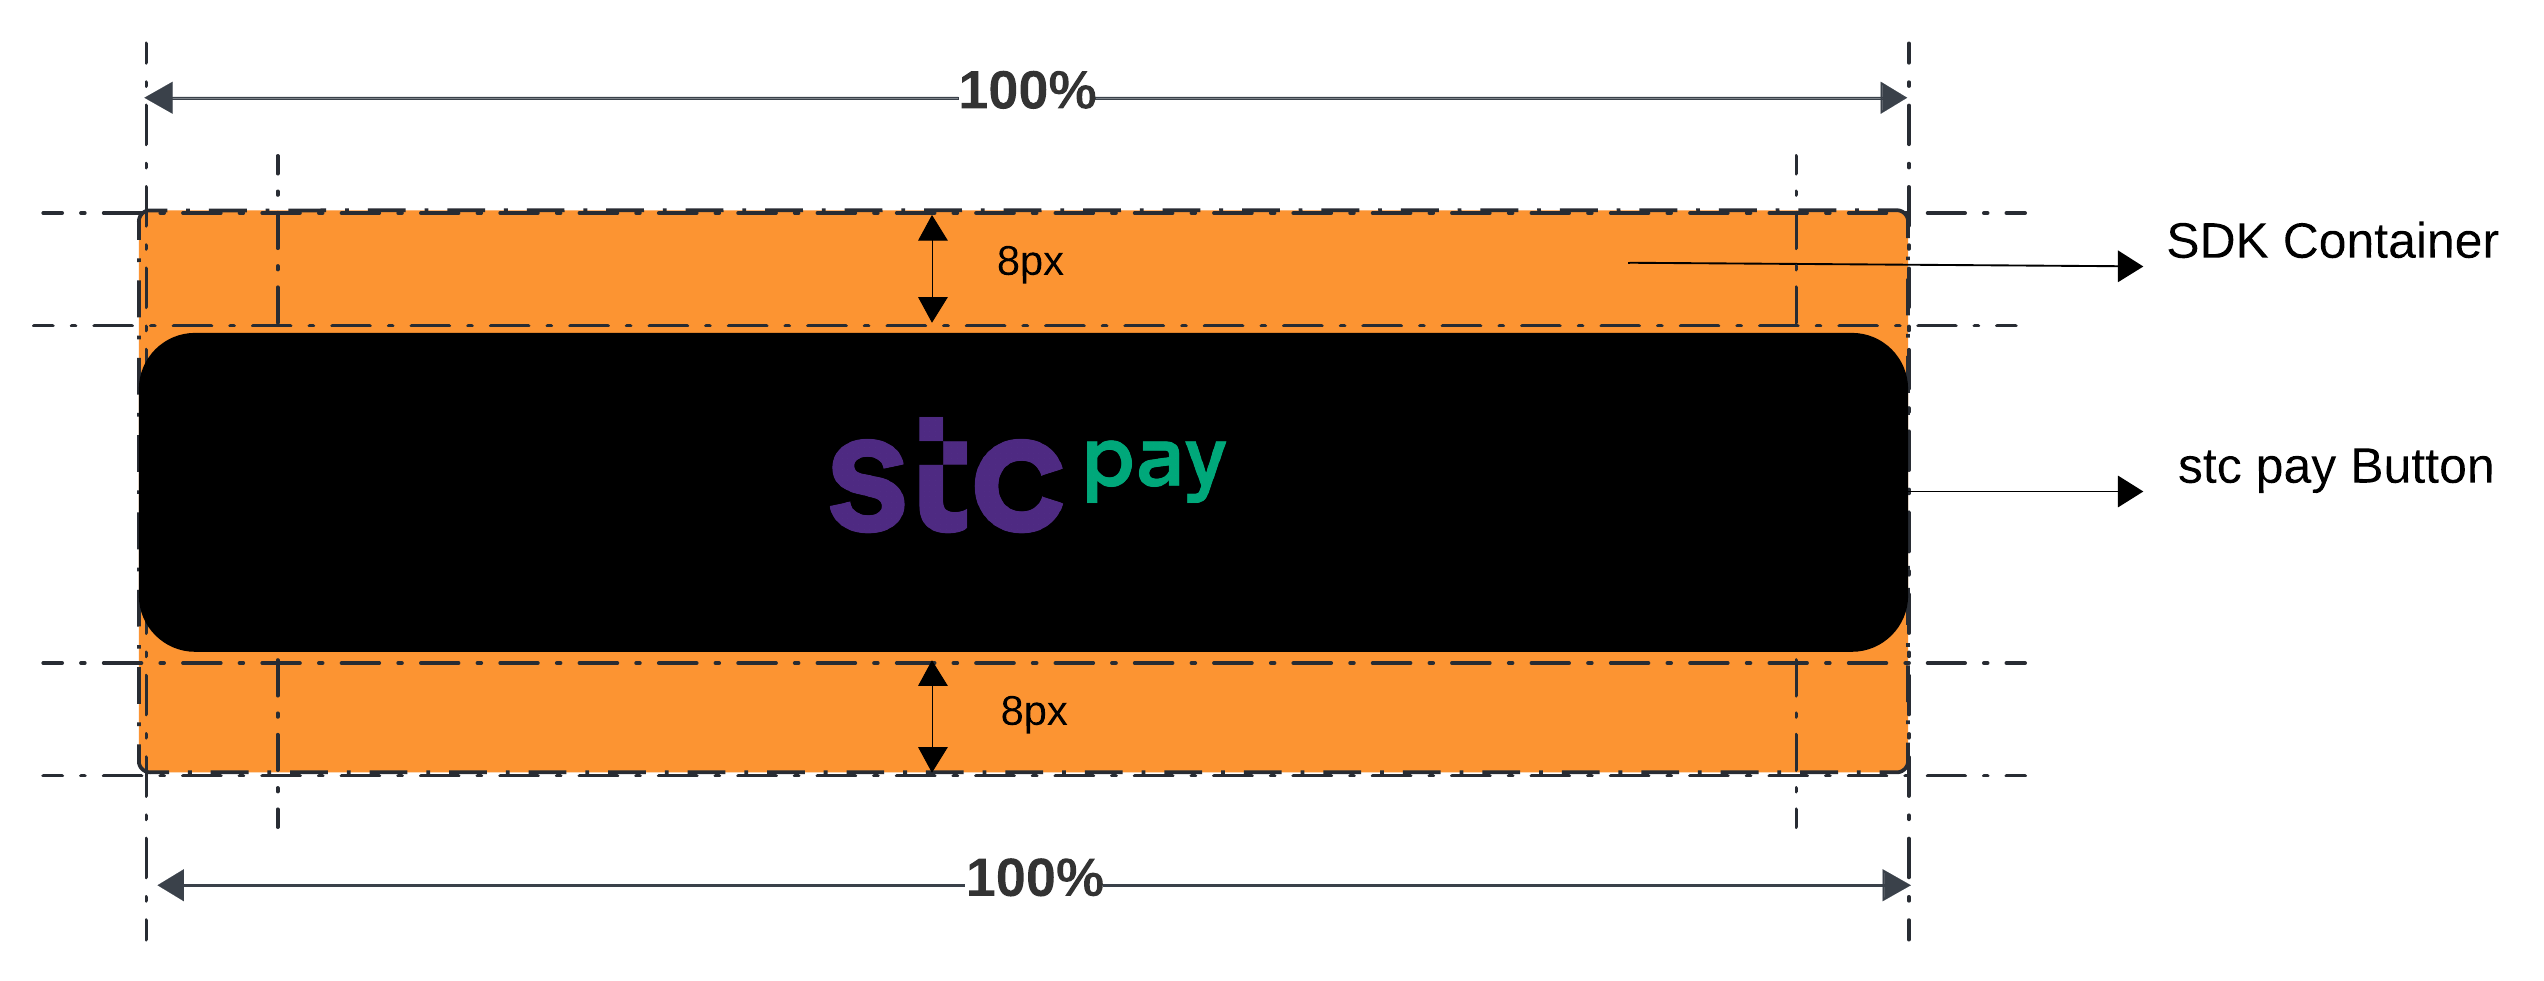
stc pay
If you have completed the stc pay integration between Ottu and stc pay, the Checkout SDK will handle the necessary checks to display the stc pay button seamlessly. When you initialize the Checkout SDK with your session_id and payment gateway codes pg_codes, the SDK will automatically verify the following conditions:
- The
session_idandpg_codesprovided during SDK initialization must be associated with the stc pay Payment Service. This ensures that the stc pay option is available for the customer to choose as a payment method. - The Web SDK displays the stc pay button irrespective of whether the customer has provided a mobile number while creating the transaction or not.
Customize Button
You can customize the stc pay button using the Checkout SDK's formsOfPayment and theme properties. The formsOfPayment property tells the Checkout SDK to render only the stc pay button. If you don't include this property, the SDK will render all available payment options.
Checkout.init({
    // Define the mandatory properties
    formsOfPayment: ["stcPay"],
    theme: {
        "stcPay": {
            "buttonColor": "black",
            "width": "100%",
            "height": "50px",
            "margin-top": "0",
            "margin-bottom": "0",
        }
    }
});
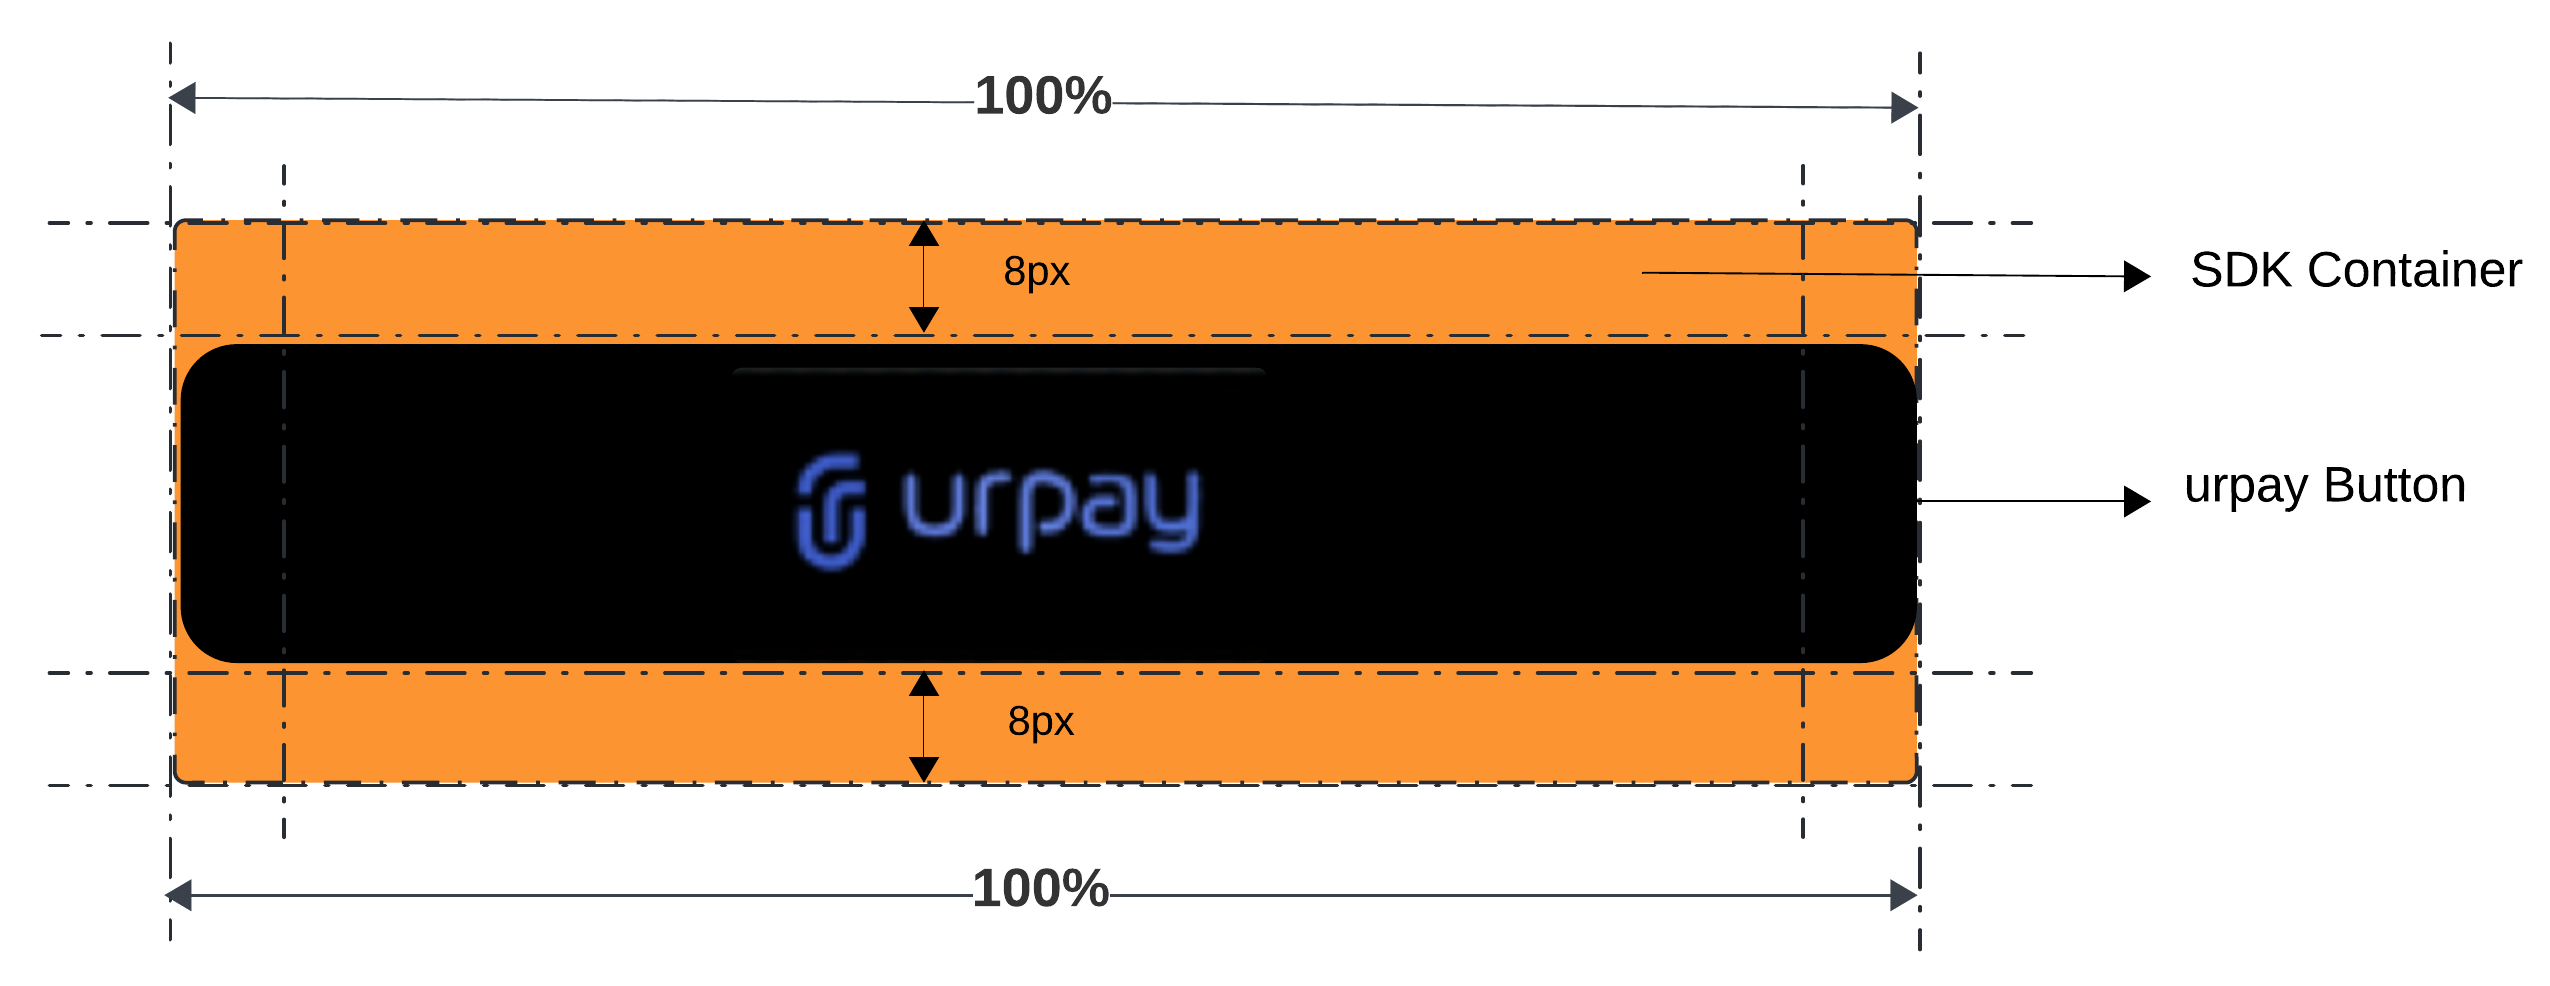
urpay
If you have completed the urpay integration between Ottu and urpay, the Checkout SDK will handle the necessary checks to display the urpay button seamlessly. When you initialize the Checkout SDK with your session_id and payment gateway codes pg_codes, the SDK will automatically verify the following conditions:
- The
session_idandpg_codesprovided during SDK initialization must be associated with the urpay Payment Service. This ensures that the urpay option is available for the customer to choose as a payment method. - The Web SDK displays the urpay button irrespective of whether the customer has provided a mobile number while creating the transaction or not.
Customize Button
You can customize the urpay button using the Checkout SDK's formsOfPayment and theme properties. The formsOfPayment property tells the Checkout SDK to render only the urpay button. If you don't include this property, the SDK will render all available payment options.
Checkout.init({
  // define the mandatory properties
  formsOfPayment: ["urPay"],
  theme: {
    urPay: {
      buttonColor: "white",
      width: "100%",
      height: "50px",
      "margin-top": "0",
      "margin-bottom": "0",
    },
  },
});
Callbacks
In the Checkout SDK, callback functions play a vital role in providing real-time updates on the status of payment transactions. Callbacks enhance the user experience by enabling seamless and efficient handling of various payment scenarios, such as errors, successful payments, and cancellations.
Please note that due to technical constraints associated with off-site redirection during the payment process, the successCallback and cancelCallback functions are only called for on-site checkouts. However, the errorCallback function is called for any kind of payments. On-site checkouts include options such as Apple Pay, Google Pay, payments with saved cards, and on-site card form transactions, which support callback functionality for a seamless user experience.
errorCallback
The errorCallback is a callback function that is invoked when issues arise during a payment. It is important to handle errors appropriately to ensure a smooth user experience. The recommended best practice in case of an error is to restart the checkout process by creating a new session_id using the Checkout API.
To define the errorCallback function, you can use the data-error attribute on the Checkout script tag to specify a global function that will handle errors. If an error occurs during a payment, the errorCallback function will be invoked with a data object with a data.status value of error
Params Available in Data Object for errorCallback
messagerequiredform_of_paymentrequiredstatusrequiredchallenge_occurredsession_idorder_noreference_number
Here's an example of how errorCallback might be defined
window.errorCallback = function (data) {
  // If the payment fails with the status "error," the SDK
  // triggers the errorCallback. In errorCallback, we show an
  // error popup by checking if form_of_payment in data is
  // "token_pay" or "redirect".
  const validFormsOfPayments = ["token_pay", "redirect"];
  if (
    validFormsOfPayments.includes(data.form_of_payment) ||
    data.challenge_occurred
  ) {
    const message =
      "Oops, something went wrong. Refresh the page and try again.";
    // Displays a popup with data.message if present; else, it displays a static message.
    window.Checkout.showPopup("error", data.message || message);
  }
  console.log("Error callback", data);
};
In this example, the errorCallback function is defined and passed as the value of the data-error attribute on the Checkout script tag. If an error occurs during a payment, the function will be invoked with a data object. This function will handle error as need and show error modal using Checkout.showPopup().
errorCallback function is not required to perform a redirection. It can handle errors in any way that is appropriate for your application.
cancelCallback
The cancelCallback in the Checkout SDK is a callback function that is invoked when a payment is canceled. To define the cancelCallback function, you can use the data-cancel attribute on the Checkout script tag to specify a global function that will handle cancellations. If a customer cancels a payment, the cancelCallback function will be invoked with a data object.with a data.status value of "canceled”
Params Available in Data Object for cancelCallback
messageform_of_paymentchallenge_occurredsession_idstatusorder_noreference_numberpayment_gateway_info
Here's an example of how cancelCallback might be defined
window.cancelCallback = function (data) {
  // If the payment fails with the status "canceled," the SDK
  // triggers the cancelCallback. In cancelCallback, we show
  // an error popup by checking if pg_name in
  // data.payment_gateway_info is "kpay" or data.form_of_payment
  // is "token_pay".
  if (
    data.payment_gateway_info &&
    data.payment_gateway_info.pg_name === "kpay"
  ) {
    // Displays a popup with pg_response as key-value pairs.
    window.Checkout.showPopup(
      "error",
      " ",
      data.payment_gateway_info.pg_response,
    );
  } else if (data.form_of_payment === "token_pay" || data.challenge_occurred) {
    const message =
      "Oops, something went wrong. Refresh the page and try again.";
    // Displays a popup with data.message if present; else, it displays a static message.
    window.Checkout.showPopup("error", data.message || message);
  }
  console.log("Cancel callback", data);
};
In this example, the cancelCallback function is defined and passed as the value of the data-cancel attribute on the Checkout script tag. If a customer cancels a payment, the function will be invoked with a data object containing information about the cancelled transaction. This function will handle cancellation as needed and show error modal using Checkout.showPopup().
successCallback
In the Checkout SDK, the successCallback is a function triggered upon successful completion of the payment process. This callback receives a data object,with a data.status value of success
Params Available in Data Object for successCallback
messageform_of_paymentchallenge_occurredsession_idstatusorder_noreference_numberredirect_urlpayment_gateway_info
The successCallback function is defined and passed as the value of the data-success attribute on the Checkout script tag. If the payment process completes successfully, the function will be invoked with a data object containing information about the completed transaction. The function will then redirect the customer to the specified redirect_url using window.location.href.
Here's an example of how successCallback might be defined
window.successCallback = function (data) {
  // If payment gets completed with status "success," SDK triggers the successCallback.
  // In successCallback, we redirect the user to data.redirect_url.
  window.location.href = data.redirect_url;
};
beforePayment Hook
To ensure the integrity of your transactions, the Checkout SDK provides a beforePayment hook that allows you to take necessary precautions before the payment process starts. It's crucial for e-commerce platforms to implement this feature, especially when considering multi-tab operations by users.
How to Implement
Initialize the Hook
- When initializing the SDK, you can set up the
beforePaymenthook which will trigger when the payment process starts.. This hook should return a Promise. If the Promise is resolved, the user may continue with the payment process. However, if the Promise is rejected, the payment process will be halted, and an error message will appear in the browser console. - For wallet payments such as
ApplePay,GooglePay, andSTCPay, the respective payment sheet will be presented. As soon as the payment process begins, the SDK will invoke thebeforePayment hook. - For other payment methods, including redirect,
ottuPG, andtokenPay, thebeforePaymenthook is triggered when thePaybutton is clicked
Params Available in Data Object for beforePayment
redirect_url
window.beforePayment = function (data) {
  return new Promise(function (resolve, reject) {
    fetch("https://api.yourdomain.com/basket/freeze", {
      method: "POST",
    })
      .then(function (response) {
        if (response.ok) {
          if (data && data.redirect_url) {
            window.Checkout.showPopup(
              "redirect",
              data.message || "Redirecting to the payment page",
              null,
            );
          }
          resolve(true);
        } else reject(new Error("Failed to freeze the basket."));
      })
      .catch(reject);
  });
};
Handle Payment Outcomes
- Success: Direct users to the payment success page.
- Cancel/Error: It's essential to unfreeze the cart to allow the user to make changes and retry the payment. Use the
cancelCallbackanderrorCallbackprovided by the SDK to handle these cases.
Best Practices
- Always freeze cart updates during ongoing payment processes. This ensures users can't manipulate cart contents in parallel with a transaction, preserving transaction integrity.
- Ensure that the cart is unfrozen in cases of payment cancellations or errors. This improves user experience, allowing them to adjust their cart if needed.
Apply Discount Based on Card PAN
In tokenPay and cardPay payment methods, the SDK passes the card details to the beforePayment callback. This allows you to identify the card brand or specific bank (via PAN) and apply a discount dynamically.
Implementation Steps:
-
Call your backend: Your frontend should notify your server about the discount eligibility. The server must then call the Ottu Checkout Patch API to update the
amountto be captured.Never call the Ottu Checkout API directly from the client side; always route it through your secure server.
-
Update the UI: Reflect the applied discount on your checkout page so the customer sees the final price before the payment sheet appears or 3DS starts.
-
Return the Promise: Ensure the
beforePaymenthook returns a promise. Resolve it once the backend update is successful so the payment proceeds with the new amount. -
Handle Cancelation/Errors: If the customer cancels or the payment fails, call your backend again to restore the original amount via the Patch API.
-
Restore UI: Update the amount shown on the page back to the original value.
Code Example:
JavaScript
// Helper to restore original amount
const restoreAmount = (sessionId) => {
  fetch("/api/restore-amount", {
    method: "POST",
    body: JSON.stringify({
      session_id: sessionId,
    }),
  }).then(() => {
    document.getElementById("total-amount").innerText = "Original Amount";
  });
};
// 1-3: Handle Discount Logic (runs before redirect/wallet payments)
window.beforePayment = (paymentData) => {
  return new Promise((resolve) => {
    const card = paymentData?.card;
    // Check if it's a card payment and has a PAN
    if (card && card.number) {
      // 1. Call your backend to apply discount via Ottu Patch API
      fetch("/api/apply-discount", {
        method: "POST",
        body: JSON.stringify({
          pan: card.number,
          session_id: "your_session_id",
        }),
      })
        .then((response) => response.json())
        .then((result) => {
          if (result.success) {
            // 2. Update the page UI with the new discounted amount
            document.getElementById("total-amount").innerText =
              result.new_amount;
          }
          // 3. Resolve the promise to proceed with updated amount
          resolve();
        })
        .catch((error) => {
          console.error("Discount application failed", error);
          resolve();
        });
    } else {
      resolve();
    }
  });
};
window.cancelCallback = (data) => {
  console.log("Payment Canceled", data);
  restoreAmount(data.session_id);
};
window.errorCallback = (data) => {
  console.error("Payment Error", data);
  restoreAmount(data.session_id);
};
// Handle successful payment
window.successCallback = (data) => {
  console.log("Payment Successful!", data);
  // Redirect to success page if redirect_url is provided
  if (data.redirect_url) {
    window.location.href = data.redirect_url;
  }
};
Checkout.init({
  selector: "checkout",
  merchant_id: "domain",
  session_id: "session_id",
  apiKey: "apiKey",
});
Card Data Structure
When tokenPay or cardPay is used, the paymentData argument in the hook will contain the following card object:
JSON
 "card": {
   "number": "445653XXXXXX1096",
   "expiry_month": "01",
   "expiry_year": "29",
   "brand": "VISA",
   "scheme": "Visa"
 }
This implementation ensures that the financial integrity of the transaction is maintained server-side while providing a smooth, responsive discount experience for the user.
validatePayment Hook
The validatePayment hook is a pre-validation step in the Checkout SDK Web, ensuring that all required payer information (e.g., terms acceptance, additional user inputs) is collected and valid before proceeding with payment.
This hook runs before any payment trigger, making sure that the payment can only proceed if all required conditions are met.
Key Features
- Hook is called before payment initiation.
- Runs before every payment method (Apple Pay, Google Pay, Redirects, Tokenization, etc.)
- Prevents incomplete payments by validating payer-provided data.
- Returns a Promise to control the flow:
- Resolves → Payment proceeds.
- Rejects → Payment submission is blocked.
- Works for all payment types, unlike
beforePayment, which runs only before redirection-based payments. - No form of payment can proceed without passing validation.
Implementation
The validatePayment hook must be defined as a global function that returns a Promise.
Example: Validating Terms Acceptance
window.validatePayment = function () {
  return new Promise((resolve, reject) => {
    // Custom validations to ensure required fields are valid for payment to proceed.
    const termsAccepted = document.getElementById("termsCheckbox").checked;

    if (termsAccepted) {
      resolve(true); // Proceed with payment
    } else {
      alert("Please accept the terms and conditions before proceeding.");
      reject(new Error("Terms not accepted")); // Block payment
    }
  });
};
How to Enable It in Checkout SDK
To enable validatePayment, include it in the SDK script tag:
<script
  src="https://assets.ottu.net/checkout/v3/checkout.min.js"
  data-validatepayment="validatePayment"
></script>
How It Works
- User initiates payment (clicks “Pay”).
- validatePayment is triggered before any payment request.
- If validation fails, the payment process stops, preventing submission.
- If validation succeeds, the payment method proceeds normally.
- Payment is completed or redirected.

Use Cases
- Ensuring Terms & Conditions Acceptance
Require users to accept terms before making a payment. - Verifying User Input
Ensure additional fields (e.g., phone number, promo code) are correctly filled. - Checking Cart Consistency
Verify that items in the cart haven’t changed before processing payment. - Blocking Suspicious Activity
Prevent payments from going through if unusual behavior is detected.
Comparison with beforePayment Hook
| Feature | validatePayment | beforePayment |
|---|---|---|
| Runs before any payment method | Yes | No (only for redirections) |
| Blocks incomplete payments | Yes | No |
| Allows verification that the required fields are valid | Yes | No |
| Runs before Apple Pay, Google Pay, Tokenization | Yes | Yes |
| Runs before Redirects | Yes | Yes |
Best Practices for Implementation
- Use clear error messages to guide users if validation fails.
- Ensure the hook runs quickly to avoid checkout delays.
- Combine with UI updates (e.g., disable the “Pay” button until valid).
- Test across different payment methods to confirm expected behavior.
Full Example: Terms + Phone Number Validation
window.validatePayment = function () {
  return new Promise((resolve, reject) => {
    const termsAccepted = document.getElementById("termsCheckbox").checked;
    const phoneNumber = document.getElementById("phoneInput").value;

    if (!termsAccepted) {
      alert("Please accept the terms and conditions.");
      return reject(new Error("Terms not accepted"));
    }

    if (!phoneNumber || phoneNumber.length < 10) {
      alert("Please enter a valid phone number.");
      return reject(new Error("Invalid phone number"));
    }

    resolve(true); // Proceed with payment
  });
};
Data Reference
data Object
The data object received by the errorCallback, cancelCallback and successCallback contains information related to the payment transaction, such as the status of the payment process, the session_id generated for the transaction, any error message associated with the payment, and more. This information can be used to handle the payment process and take appropriate actions based on the status of the transaction.
Data Object Child Parameters
-
message
stringIt is a string message that can be displayed to the customer. It provides a customer-friendly message regarding the status of the payment transaction.
-
session_id
stringIt is a unique identifier generated when a payment transaction is created. It is used to associate a payment transaction with the checkout process. You can find the
session_idin the response of the Checkout API's session_id endpoint. This parameter is required to initialize the Checkout SDK. -
status
stringIt is of the checkout process. Possible values are:
success: The customer was charged successfully, and they can be redirected to a success page or display a success message.canceled: The payment was either canceled by the customer or rejected by the payment gateway for some reason. When a payment is canceled, it's typically not necessary to create a new payment transaction, and the same session_id can be reused to initiate the Checkout SDK and allow the customer to try again. By reusing the same session_id, the customer can resume the checkout process without having to re-enter their payment information or start over from the beginning.error: An error occurred during the payment process, This can happen for a variety of reasons, such as a network failure or a problem with the payment gateway's system. The recommended action is to create a new payment transaction using the Checkout API and restart the checkout process.
-
redirect_url
URLThe URL where the customer will be redirected after the payment stage only if the webhook URL returns a success status. order_no, reference_number and session_id will be appended to the redirect URL as query parameters. The developer implementing the SDK must ensure that the redirection process is smooth and secure, providing a seamless experience for the customer while maintaining the integrity of the payment process.
It's important to note that while the redirect_url option is typically present only in the successCallback, there are specific cases where it may exist in failure scenarios.
For example, in the event of an MPGS cancel or if the transaction includes a webhook URL alongside a redirect URL, users may be redirected after cancellation, which is communicated to the webhook. Therefore, the presence of redirect_url in such cases is possible.
-
order_no
stringThe order number provided in the Checkout API. See Checkout API & order_no.
-
reference_number
stringA unique identifier associated with the payment process. It is sent to the payment gateway as a unique reference and can be used for reconciliation purposes.
-
form_of_payment
stringEnum:
apple_pay,google_pay,token_pay,stc_pay,redirectIndicates the form of payment used to process the transaction. This can be one of several options, including
apple_pay,google_pay,token_pay,stc_pay, orredirect. It's important to note that the redirect option is only present in theerrorCallback. In other scenarios, especially withcancelCallbackandsuccessCallback, it's absent. This is because, in the redirect flow, the customer is redirected to a different page where actions like payment cancellation or confirmation occur, not on the page where the SDK is displayed.apple_pay- Apple Paygoogle_pay- Google Paytoken_pay- Token Paystc_pay- stc payredirect- Redirect
-
payment_gateway_info
objectInformation about the payment gateway, accompanied by the response received from the payment gateway
-
pg_code
stringThe unique identifier, or
pg_code, for the payment gateway that was used to process the payment. This value corresponds to the specific payment method utilized by the customer, such ascredit-card. -
pg_name
stringThe name of the payment gateway, represented in all lowercase letters, that was used to perform the payment. This could be one of several values, such as
kpay(for KNET),mpgs, orcybersource. These identifiers provide a human-readable way to understand the payment mechanism that was utilized. -
pg_response
objectThe raw response data that was received directly from the payment gateway after the transaction attempt. This typically includes transaction status, transaction identifier, and potentially error messages or additional data provided by the gateway.
-
challenge_occurred
boolDefault: false
This flag indicates if an additional verification, such as 3DS, OTP, PIN, etc., was initiated during the payment process. Use this flag incancelCallbackanderrorCallbackto control the presentation of error messages, especially for on-site payments undergoing a challenge flow. For example, after a failed 3DS verification, it's useful to show a custom popup informing the user of the payment failure. However, it's crucial to note that not all on-site failed payments need custom error messaging. In cases likeGooglePayorApplePay, error messages are inherently handled by the Payment Sheet, which remains open for the user to retry, making this distinction vital.
Methods
showPopup
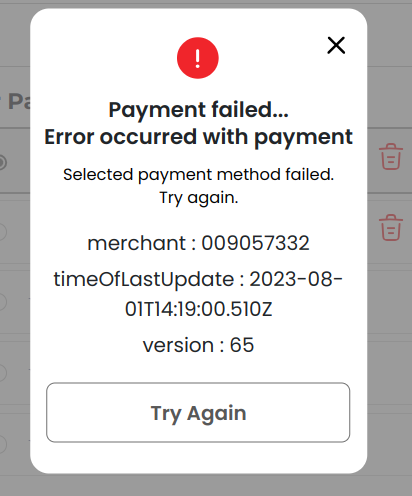
Is a function that shows a message in a popup on the screen. The message parameter must be a string, and the optional pg_response parameter is an object that displays key-value pairs representing object values within the popup.
Popup will not display null values passed in the response.
- type
string
The type identifies the modal that should be displayed to the customer. Supported values areerror,success&redirect - message
string
The message for a failed payment can be displayed to the customer. - pg_response
object
The raw response data that was received directly from the payment gateway after the transaction attempt. This typically includes transaction status, transaction identifier, and potentially error messages or additional data provided by the gateway.pg_responseis only supported by typeerror&success
Example
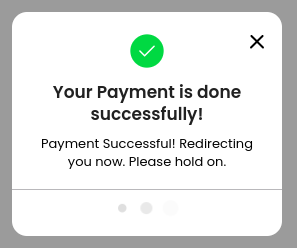
Checkout.showPopup(
  'success',
  'Payment Successful! Redirecting you now. Please hold on.',
);
Checkout.showPopup('error', 'Selected payment method failed. Try again.', {
  merchant: '009057332',
  timeOfLastUpdate: '2023-08-01T14:19:00.510Z',
  version: '65',
});
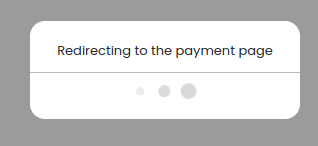
Checkout.showPopup(
  'redirect',
  'Redirecting to the payment page'
);
Examples
Basic Example
window.errorCallback = function (data) {
  // If payment fails with status "error," SDK triggers the
  // errorCallback. In errorCallback, we show an error popup by
  // checking if form_of_payment in data is "token_pay" or "redirect".
  let validFormsOfPayments = ["token_pay", "redirect"];
  if (
    validFormsOfPayments.includes(data.form_of_payment) ||
    data.challenge_occurred
  ) {
    const message =
      "Oops, something went wrong. Refresh the page and try again.";
    // Displays a popup with data.message if present, else it displays a static message.
    window.Checkout.showPopup("error", data.message || message);
  }
  console.log("Error callback", data);
  // Unfreeze the basket upon an error
  unfreezeBasket();
};

window.successCallback = function (data) {
  // If payment gets completed with status "success," SDK triggers the
  // successCallback. In successCallback, we redirect the user to data.redirect_url.
  window.location.href = data.redirect_url;
};

window.cancelCallback = function (data) {
  // If payment fails with status "canceled," SDK triggers the cancelCallback.
  // In cancelCallback, we show an error popup by checking if pg_name in
  // data.payment_gateway_info is "kpay" or data.form_of_payment is "token_pay".
  if (
    data.payment_gateway_info &&
    data.payment_gateway_info.pg_name === "kpay"
  ) {
    // Displays a popup with pg_response as key-value pairs.
    window.Checkout.showPopup(
      "error",
      "",
      data.payment_gateway_info.pg_response,
    );
  } else if (data.form_of_payment === "token_pay" || data.challenge_occurred) {
    const message =
      "Oops, something went wrong. Refresh the page and try again.";
    // Displays a popup with data.message if present, else it displays a static message.
    window.Checkout.showPopup("error", data.message || message);
  }
  console.log("Cancel callback", data);
  // Unfreeze the basket upon an error
  unfreezeBasket();
};

// Before any payment action (Apple Pay, Google Pay, token payments, direct payments, etc.)
window.beforePayment = function (data) {
  return new Promise(function (resolve, reject) {
    fetch("https://api.yourdomain.com/basket/freeze", {
      method: "POST",
    })
      .then(function (response) {
        if (response.ok) {
          if (data && data.redirect_url) {
            window.Checkout.showPopup(
              "redirect",
              data.message || "Redirecting to the payment page",
              null,
            );
          }
          resolve(true);
        } else reject(new Error("Failed to freeze the basket."));
      })
      .catch(reject);
  });
};

function unfreezeBasket() {
  fetch("https://api.yourdomain.com/basket/unfreeze", {
    method: "POST",
  });
  // Handle unfreeze basket responses or errors if necessary
}

Checkout.init({
  selector: "checkout",
  merchant_id: "sandbox.ottu.net",
  session_id: "session_id",
  apiKey: "apiKey",
  lang: "en",
  displayMode: "grid", // default is column
});
Full Example
HTML
</head>
    <div id="checkout"></div>
    <script src='https://assets.ottu.net/checkout/v3/checkout.min.js'
        data-error="errorCallback"
        data-success="successCallback"
        data-cancel="cancelCallback"
        data-beforepayment="beforePayment">
    </script>
JS
window.errorCallback = function(data) {
    // If payment fails with status “error” SDK triggers
    // the errorCallback, In errorCallback we show an error
    // popup by checking if form_of_payment in data is
    // “token_pay” or “redirect”.
    let validFormsOfPayments = ['token_pay', 'redirect'];
    if (validFormsOfPayments.includes(data.form_of_payment) ||
        data.challenge_occurred) {
        const message = "Oops, something went wrong. Refresh the page and try again.";
        // Displays a popup with data.message if present, else displays static message.
        window.Checkout.showPopup("error", data.message || message);
    }
    console.log('Error callback', data);
    // Unfreeze the basket upon an error
    unfreezeBasket();
}

window.successCallback = function(data) {
    // If payment gets completed with status “success” SDK
    // triggers the successCallback, In successCallback we
    // redirect the user to data.redirect_url
    window.location.href = data.redirect_url;
}

window.cancelCallback = function(data) {
    // If payment fails with status “canceled” SDK triggers
    // the cancelCallback, In cancelCallback we show error
    // popup by checking if pg_name in data.
    // payment_gateway_info is “kpay” or data.form_of_payment
    // is “token_pay”.
    if (data.payment_gateway_info &&
        data.payment_gateway_info.pg_name === "kpay") {
        // Displays a popup with pg_response as key-value pairs.
        window.Checkout.showPopup("error", '', data.payment_gateway_info.pg_response);
    } else if (data.form_of_payment === "token_pay" ||
        data.challenge_occurred) {
        const message = "Oops, something went wrong. Refresh the page and try again.";
        // Displays a popup with data.message if present, else displays static message.
        window.Checkout.showPopup("error", data.message || message);
    }
    console.log('Cancel callback', data);
    // Unfreeze the basket upon an error
    unfreezeBasket();
}

// Before any payment action (Apple Pay, Google Pay, token payments, direct payments, etc.)
window.beforePayment = function(data) {
    return new Promise(function(resolve, reject) {
        fetch('https://api.yourdomain.com/basket/freeze', {
            method: 'POST'
        })
        .then(function(response) {
            if (response.ok) {
                if (data && data.redirect_url) {
                    window.Checkout.showPopup('redirect', data.message || 'Redirecting to the payment page', null);
                }
                resolve true;
            }
            else reject new Error('Failed to freeze the basket.');
        })
        .catch(reject);
    });
}

function unfreezeBasket() {
    fetch('https://api.yourdomain.com/basket/unfreeze', {
        method: 'POST'
    })
    // Handle unfreeze basket responses or errors if necessary
}
JS
Checkout init function
Checkout.init({
  selector: "checkout",
  merchant_id: "sandbox.ottu.net",
  session_id: "session_id",
  apiKey: "apiKey",
  lang: "en", // en or ar default en
  formsOfPayments: [
    "applePay",
    "googlePay",
    "stcPay",
    "ottuPG",
    "tokenPay",
    "redirect",
    "urPay",
  ],
  displayMode: "grid", // default is column
  applePayInit: {
    supportedNetworks: ["amex", "masterCard", "maestro", "visa", "mada"],
    merchantCapabilities: ["supports3DS"],
  },
  googlePayInit: {
    apiVersion: 2,
    apiVersionMinor: 0,
    allowedCardNetworks: [
      "AMEX",
      "DISCOVER",
      "INTERAC",
      "JCB",
      "MASTERCARD",
      "VISA",
    ],
    allowedCardAuthMethods: ["PAN_ONLY", "CRYPTOGRAM_3DS"],
    tokenizationSpecificationType: "PAYMENT_GATEWAY",
    baseCardPaymentMethodType: "",
    paymentsClient: null,
    totalPriceStatus: "FINAL",
    totalPriceLabel: "Total",
    buttonLocale: "en",
  },
});